Profiles
Profiles are used to define parameters for devices and for the network management in general in a way that greatly simplifies the act of device registration. Once a profile is defined, registering a device is simply a matter of selecting the appropriate profile.
There are several kinds of profiles, but in this document, we will mention only the two kinds that are seen directly by a device owner. These are the “Device Profile” and “Service Profile”.
-
Device Profile: Defines a type of device with all the needed parameters. Typically, once a device profile has been defined for one kind of device, e.g. a particular type of temperature sensor, this profile will be used to register all the devices of that kind. This means that there is no need for the owner to enter any of the otherwise complicated LoraWAN parameters that the network needs to be able to correctly control the device.Creation of a Device Profile will be described in the next section.
-
Service Profile: It is a profile that is defined by the network operator. It details how the device should be managed by the network. I.e. it contains information about things like Quality-of-Service (QoS), allowed network features, such as real-time downlink, Class B and C operations, etc. A user account may have access to several service profiles and can chose the one best fitting the need when registering a device, however, often there is just one default service profile.
Creating a Device Profile
To see the available device profiles, select “Device Profiles” from the Profiles menu.
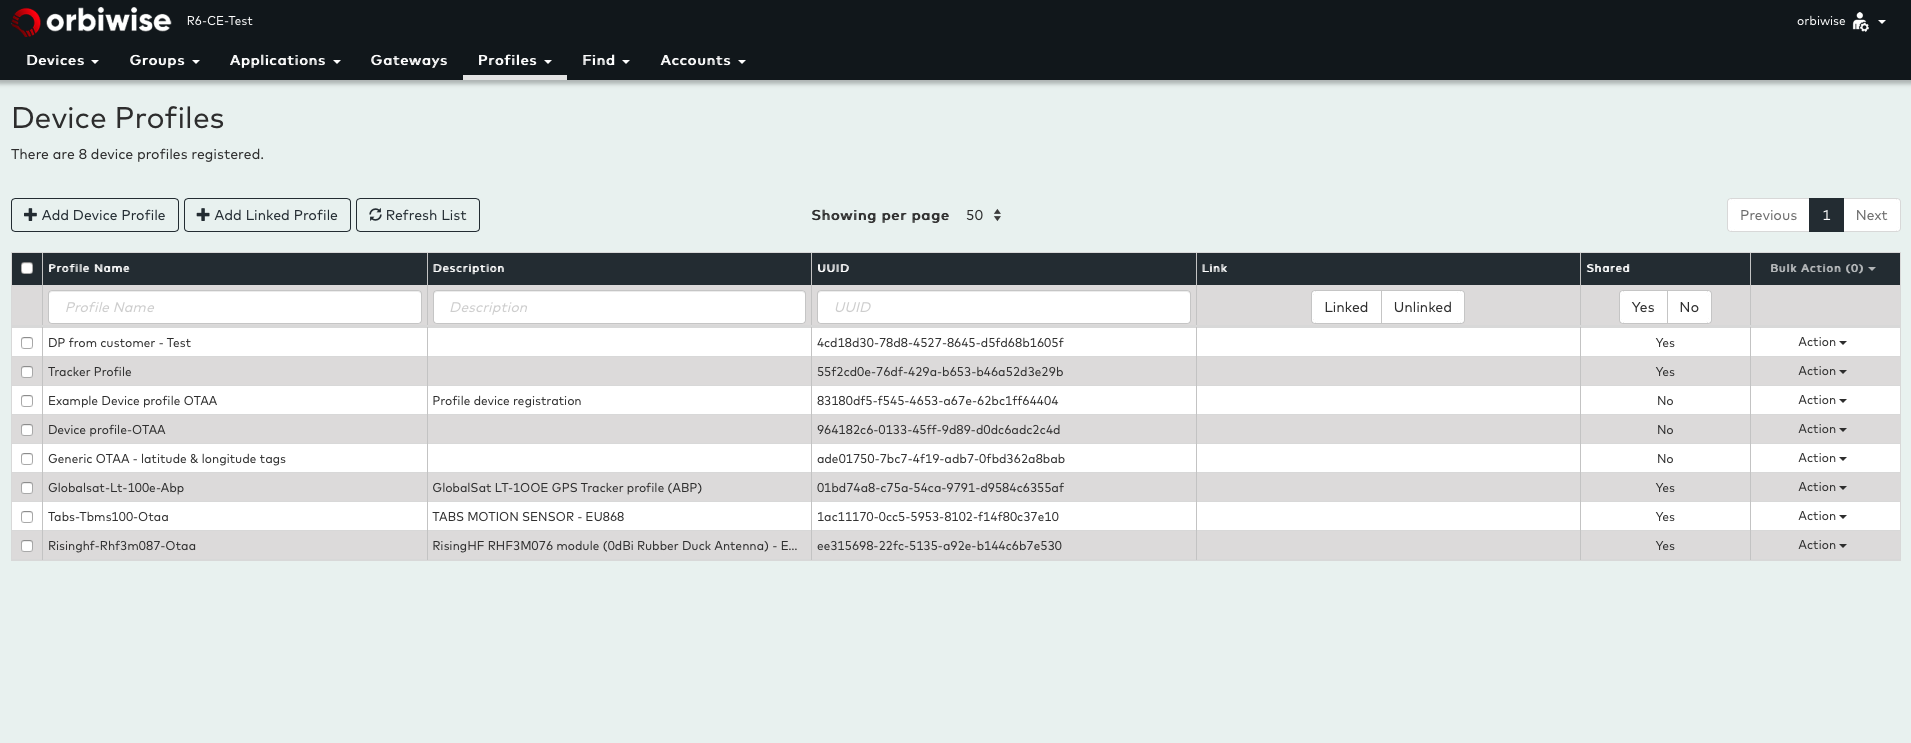
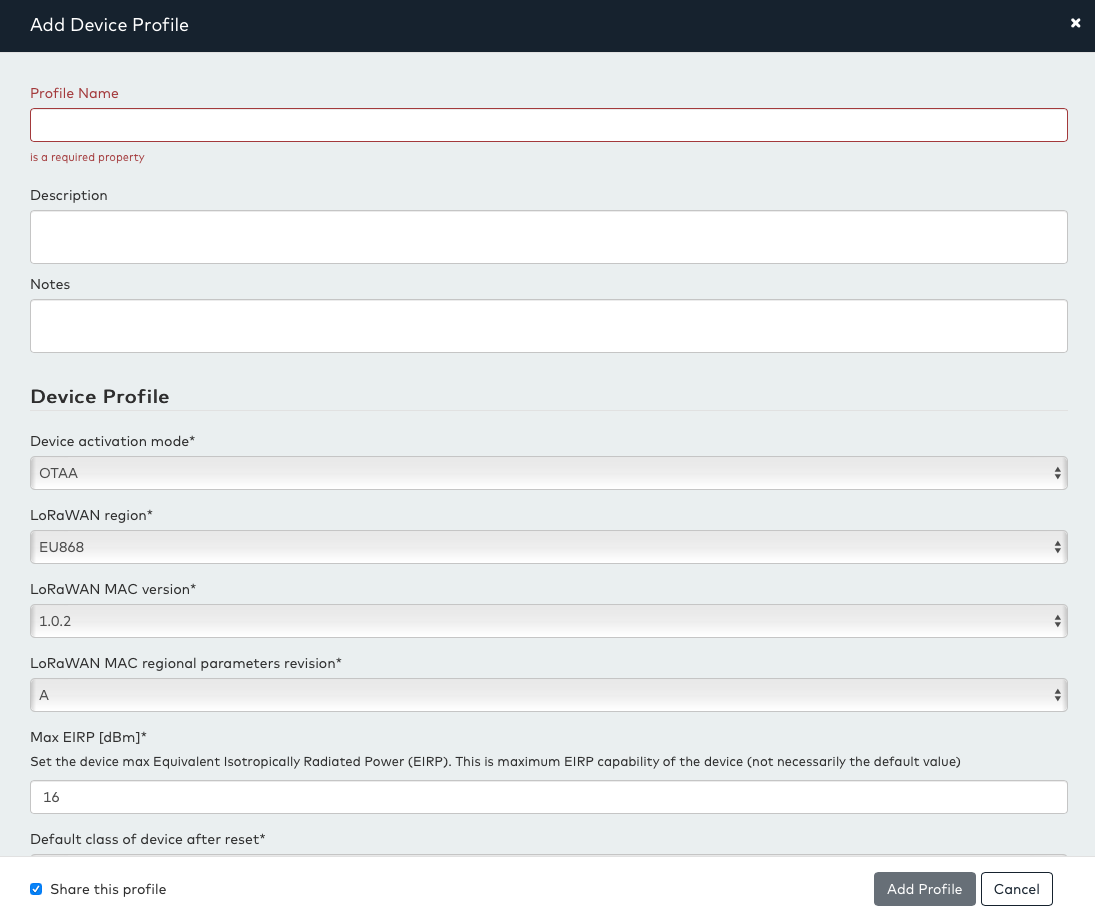
This shows the list of device profiles already available. A profile is uniquely identified by the UUID, but also have profile name and an optional description. Profiles created on a customer account can be “shared” and will hence be seen also by all users’ accounts belonging to that customer account. This way a customer account can pre-create all the profiles and make then shared so it’s users can use them. This is the typical scenario; hence the users will be able to register device directly using these profiles without having to know any technical details about the device. To add a new device profile, press the “Add Device Profile” button. This opens the following window:
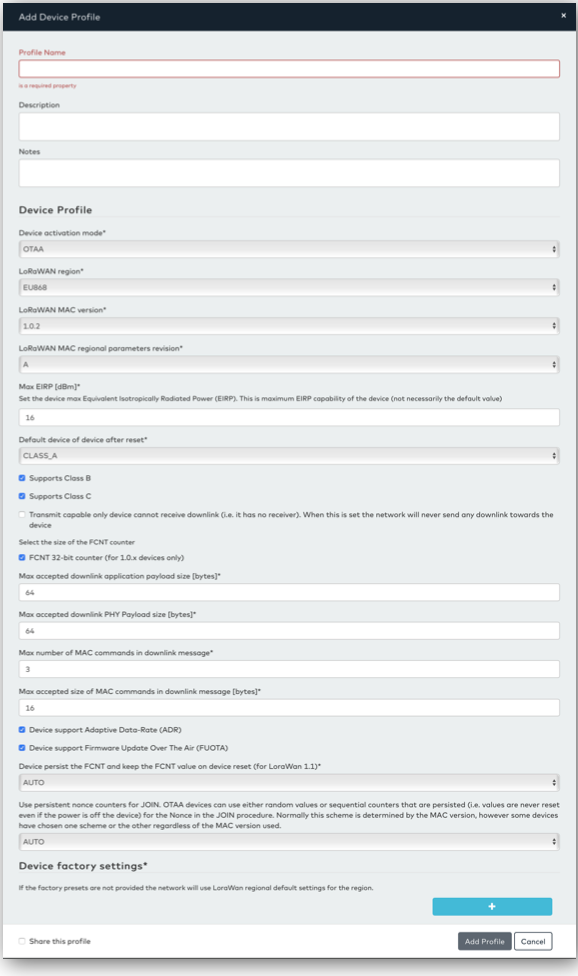
This window has a lot of settings, however in most cases the default values are correct and only the device profile name needs to be filled. The three most important fields to check are:
- Device activation mode which can be ABP (Activation By Personalization) or OTAA(Over The Air Activation),
- LoraWAN MAC version
- LoraWAN regional parameters revision.
The values for these parameters should always be provided by a device vendor.
If the profile is created under a customer account, the “Share this Profile” checkbox can be set to make this profile available to all users belonging to this customer account. Once the profile has been filled, click “Add Profile” to complete the device profile creation. The newly created profile should be seen in the list of device profile after the dialog box is closed.
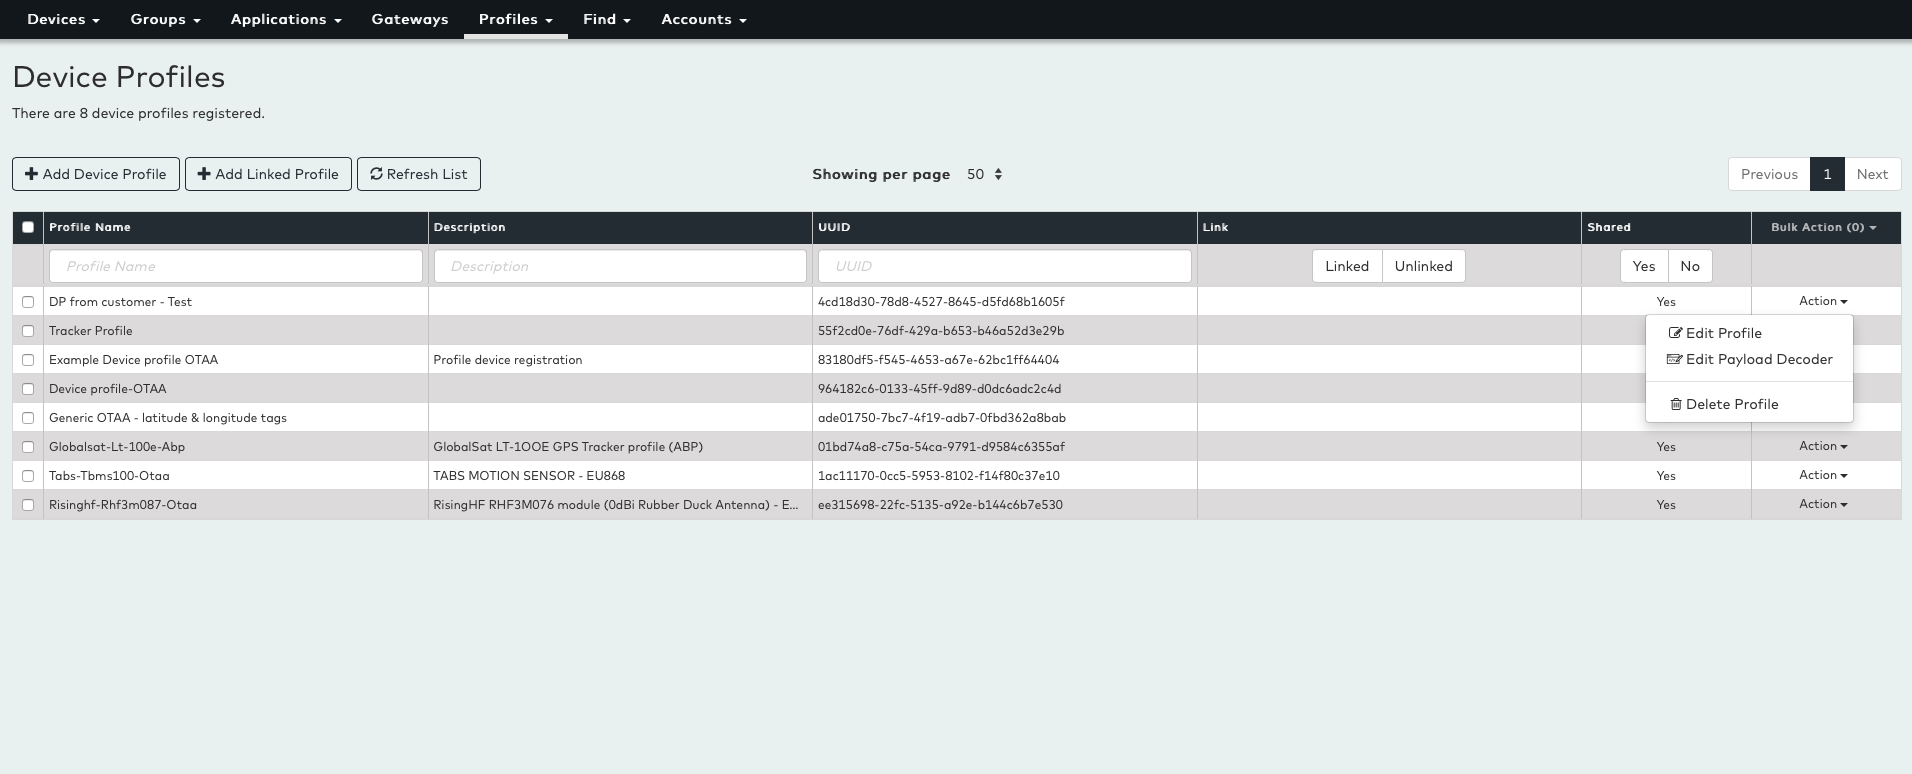
Device profiles can be edited and deleted again via the action menu on the left of the profile table.
Note: For device profile, once a profile is created it is still possible to edit and delete the profile, but once it is used (either referenced by a device or linked) it cannot be deleted and only limited changes to the profile is permitted. Once the profile is no longer referenced it can be deleted and modified again.
The details on each field in the device profile dialog box is outside the scope of this document.
Linking a Device Profile
Device profiles always belong to some account and can be shared from a customer account to all users. But sometimes it is desirable to make profiles available in a more restricted and controlled way. This can be done by making Profile Links.
A link is created on an account and can point to a profile on another account. This way an operator can have all the actual device profiles on the operator account and then create links to these profiles for the customers that need access these profiles. Links are pointer that points back to an actual profile, and if the source profile is changed, it will also affect the devices using the same profile via the link.
Links are normally created by accounts with administration rights. A profile can be linked to and from any account that the administrator has rights to. To create a link, press the “Add Linked Profile” button. This will open the following dialog box:
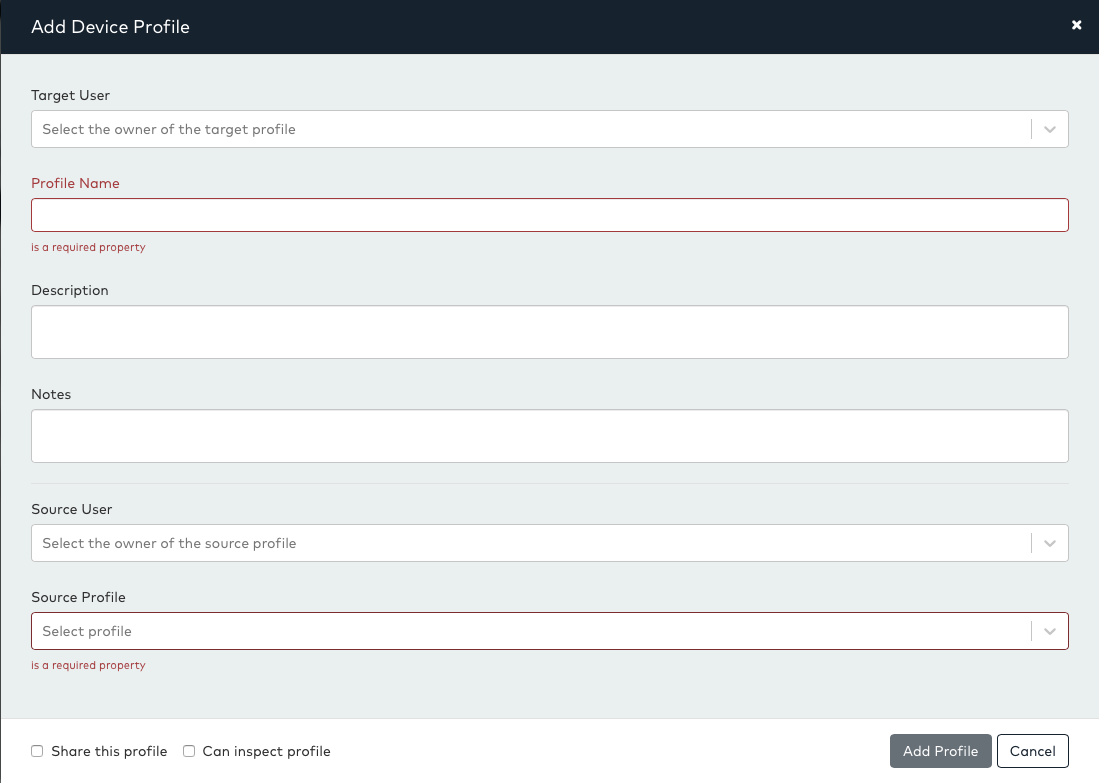
A link is given a name, a description and a note like a normal profile and after creation it will look and behave like a profile, except that it cannot be edited as it is only a pointer to real profile.
In the dialog box it is possible (for admin users) to select the Target User account where the link will be created. It is also possible to select the Source User (for admin users) where the Source Profile can be found and finally the source profile can be selected from the source profile dropdown.
When the link is created it is also possible to decide if the content of the profile can be inspected by the user of the link. If the “Can inspect profile” checkbox is checked on the link, the target user account for the link will be able to see the content of the profile (but cannot edit it).
If the “Can inspect profile” checkbox is not checked, the target user will not be able to see the content of the profile but can still use the profile to register devices.
Click “Add Profile” to finally create the link. Once created it will appear in the list of profile. Links can be distinguished from profile by having a non-empty “Link” column as shown in the pic below:
Sharing a Device Profile
A customer can choose to make profiles at the customer level visible to all its user accounts (without using Link). This can be done by selecting the Share this profile option at the bottom of a profile as seen below:
Also when a link is created on a customer account it is possible to check the “Share this profile” checkbox to make the link visible on all user accounts belonging to this customer account.
Other Profiles
As mentioned initially, OrbiWAN use several types of profile with the device profile being the most immediately used profile. In addition to the Device Profile the device registration also requires a Service profile that is typically created by the operator and not by the customer. However, customer can be given rights to also create service profiles as well as the other types of profiles.
The Service profile does not have any parameters but does point to four sub-profiles called:
- Connectivity-Profile
- Roaming-Profile
- QoS Profile
- Channel Profile
Note- These profiles are outside the scope of this document. Creating and managing these profiles is analogue to device profile. An account must have explicit rights to manipulate profiles of each kind. If the account does not have any rights for a particular type of profile, the menu item and profile view for that kind of profile will be hidden.
A normal non-admin user will typically have full manipulation rights for Device Profiles but will have list-only rights for the Service Profile (i.e. the user is able to see available profiles only but cannot Inspect, Edit or Create) and no rights for any of the other profiles.