Device Management
Register Device
- Once you login
- Go to Devices
- Click on Manage devices.
- There will be option to Add device.
Add device with profile.
OrbiWan from release 6 uses profiles to manage the increasingly complex set of parameters that are needed to manage devices. Two kind of profiles are assigned to each device.
Device Profile defines a type of device with all the needed parameters. Typically, once a device profile has been defined for one kind of device, e.g. a particular type of temperature sensor, this profile will be used to register all the devices of that kind. This means that there is no need for the owner to enter any of the otherwise complicated LoraWAN parameters that the network needs to be able to correctly control the device.
Service Profile is a profile that is defined by the operator. It details how the device should be managed by the network. I.e. it contains information about things like Quality-of-Service (QoS), allowed network features, such as real-time downlink, Class B and C operations, etc. A user account may have access to several service profiles and can chose the one best fitting the need when registering a device. However, often there is just one default service profile.
Below are the steps to add device with profile
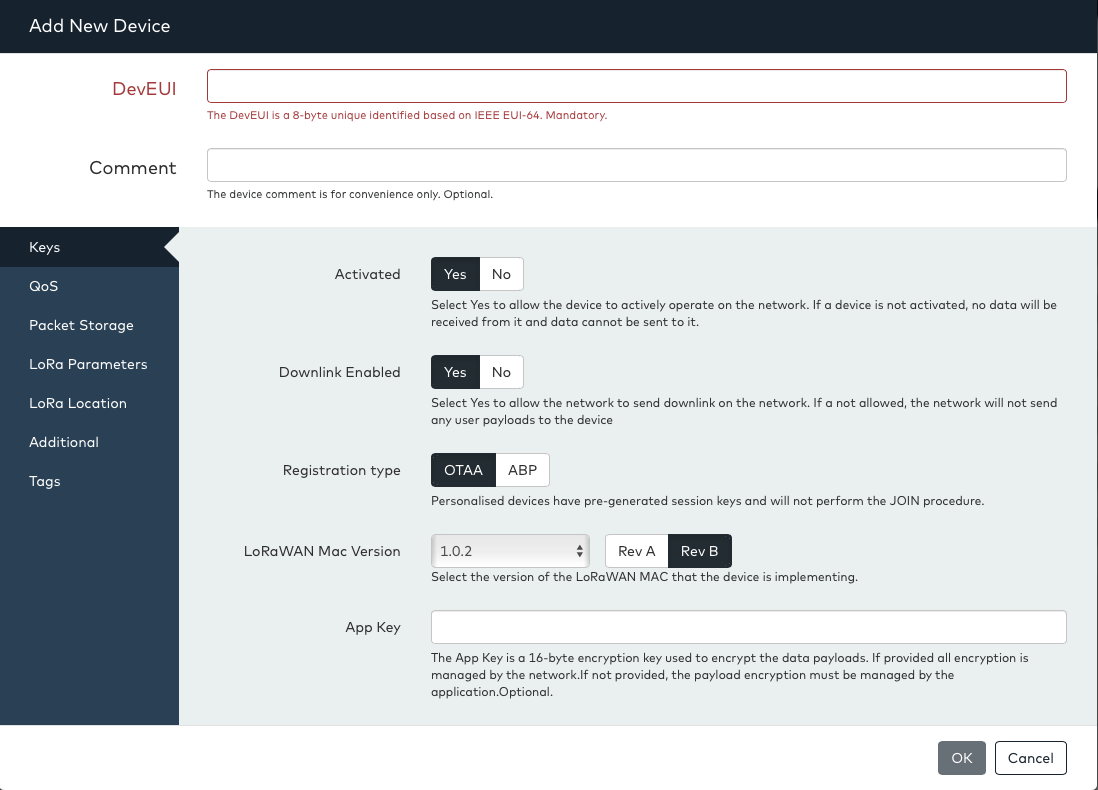
On clicking the Add Device with profile button brings up the following pop-up window:

When using profiles, the number of fields needed to register a device is far less than when doing direct registration.
When a customer/user register a new device a device profile and service profile must be selected and provided in the registration message
Profiles can be created as links and referenced from other accounts. For example a customer may create a device profile at the root level of the customer account, and then share this profile as links to some of its users. As it is a link, if the root profile is changed, the change will automatically apply to all the linked usages of the profile
Create Device Profile
We can create Device Profiles:-
- Profiles
- Device Profiles
- Add Device Profile
- Specify the required parameters
- Add Profile
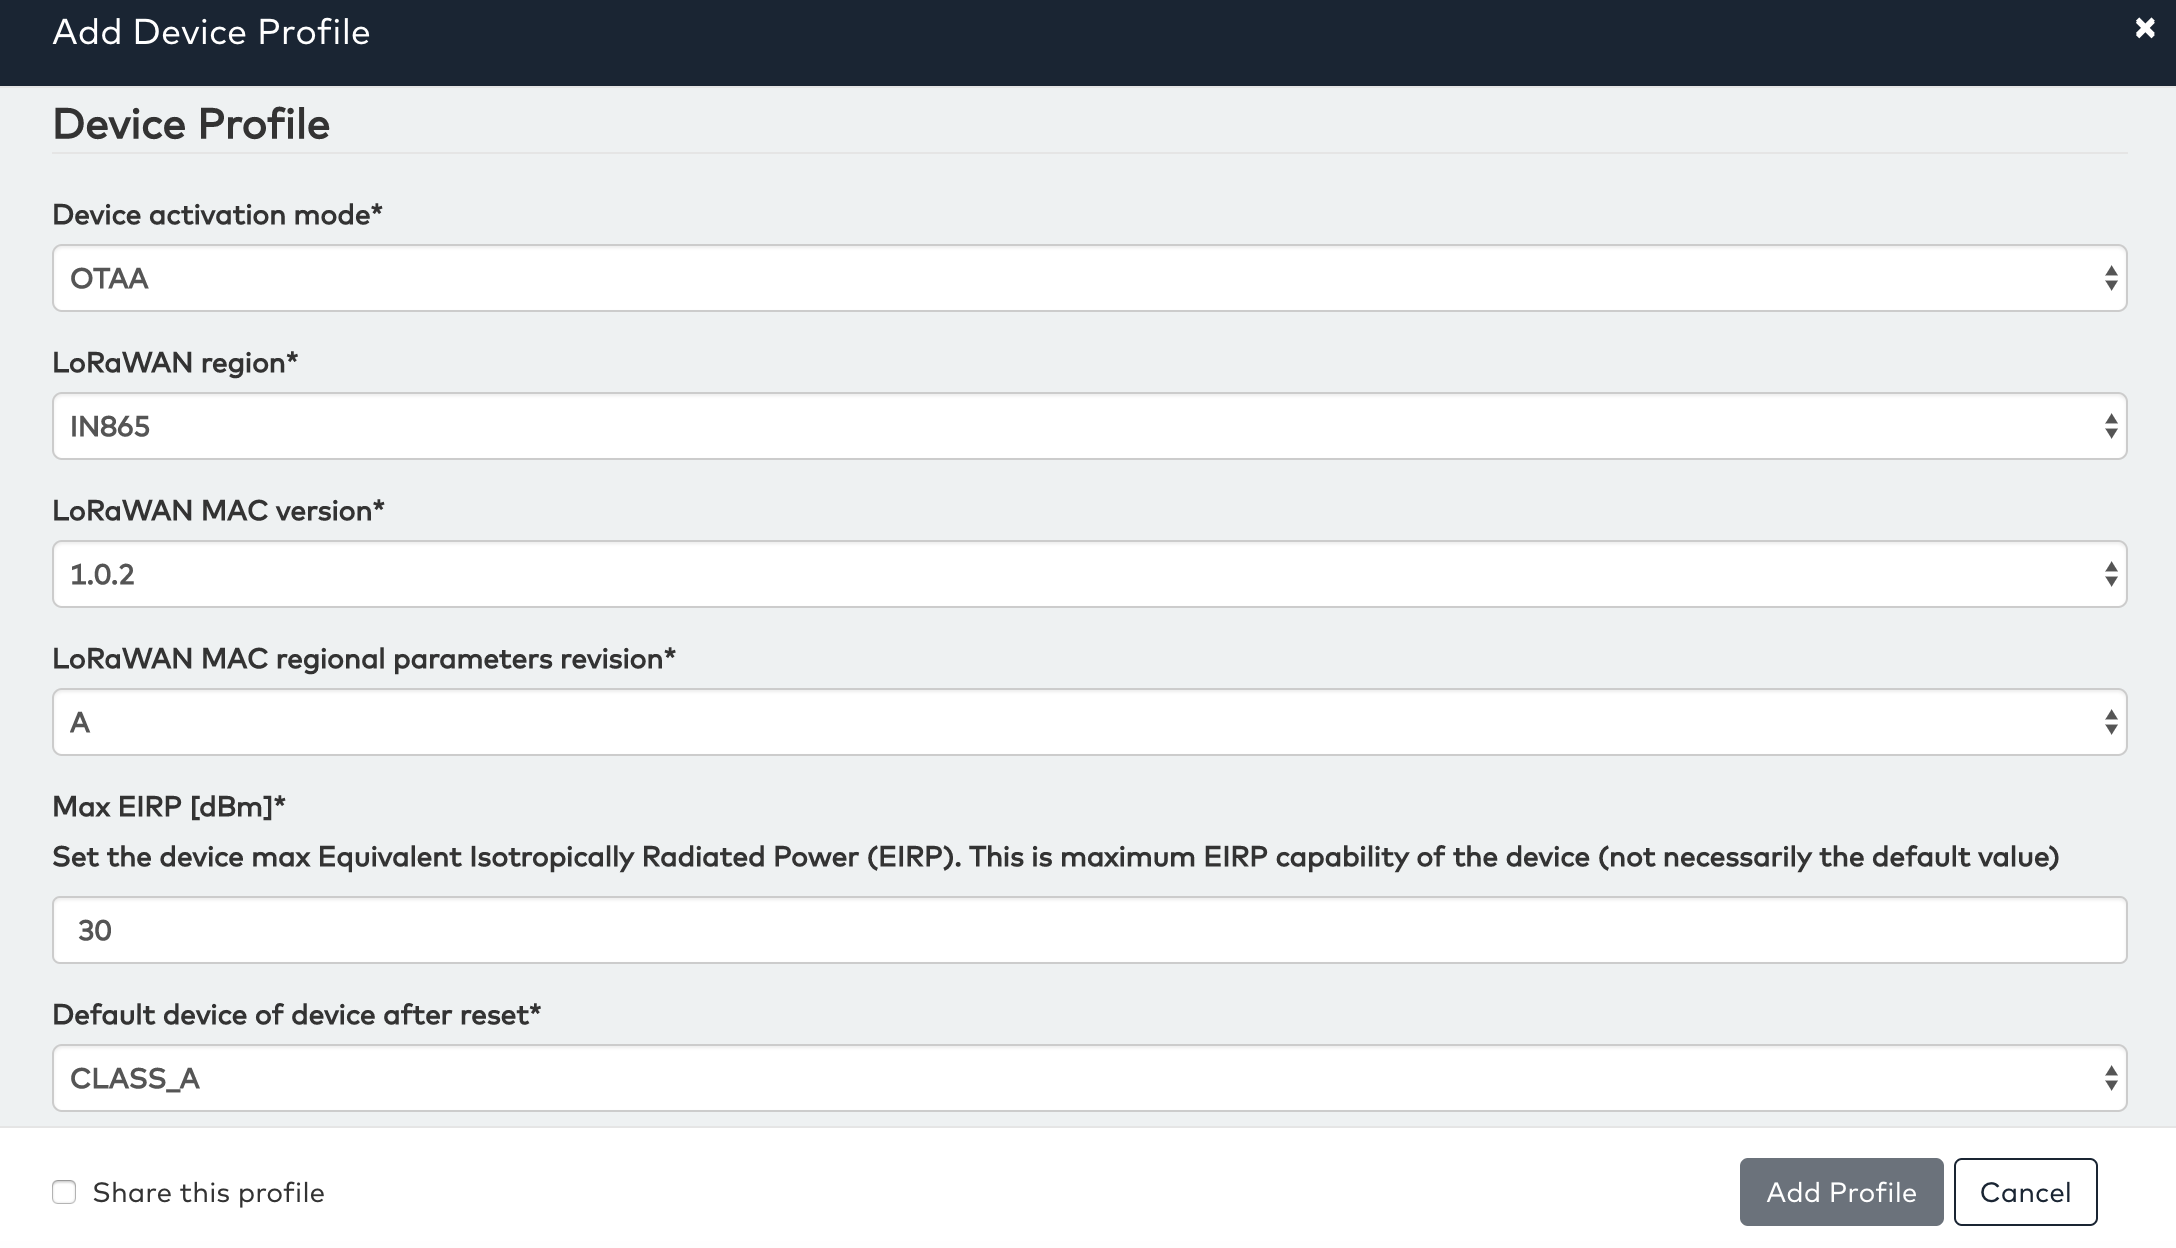
We have to mention whether the device is OTAA or ABP in the device activation mode field.
The LoRaWAN MAC version needs to be selected from a pre-defined list of allowed values.
You can also watch the following videos to see the Device Activation process in action:
Device Join via ABP Activation (Profile)
Device Join via OTAA Activation (Profile)
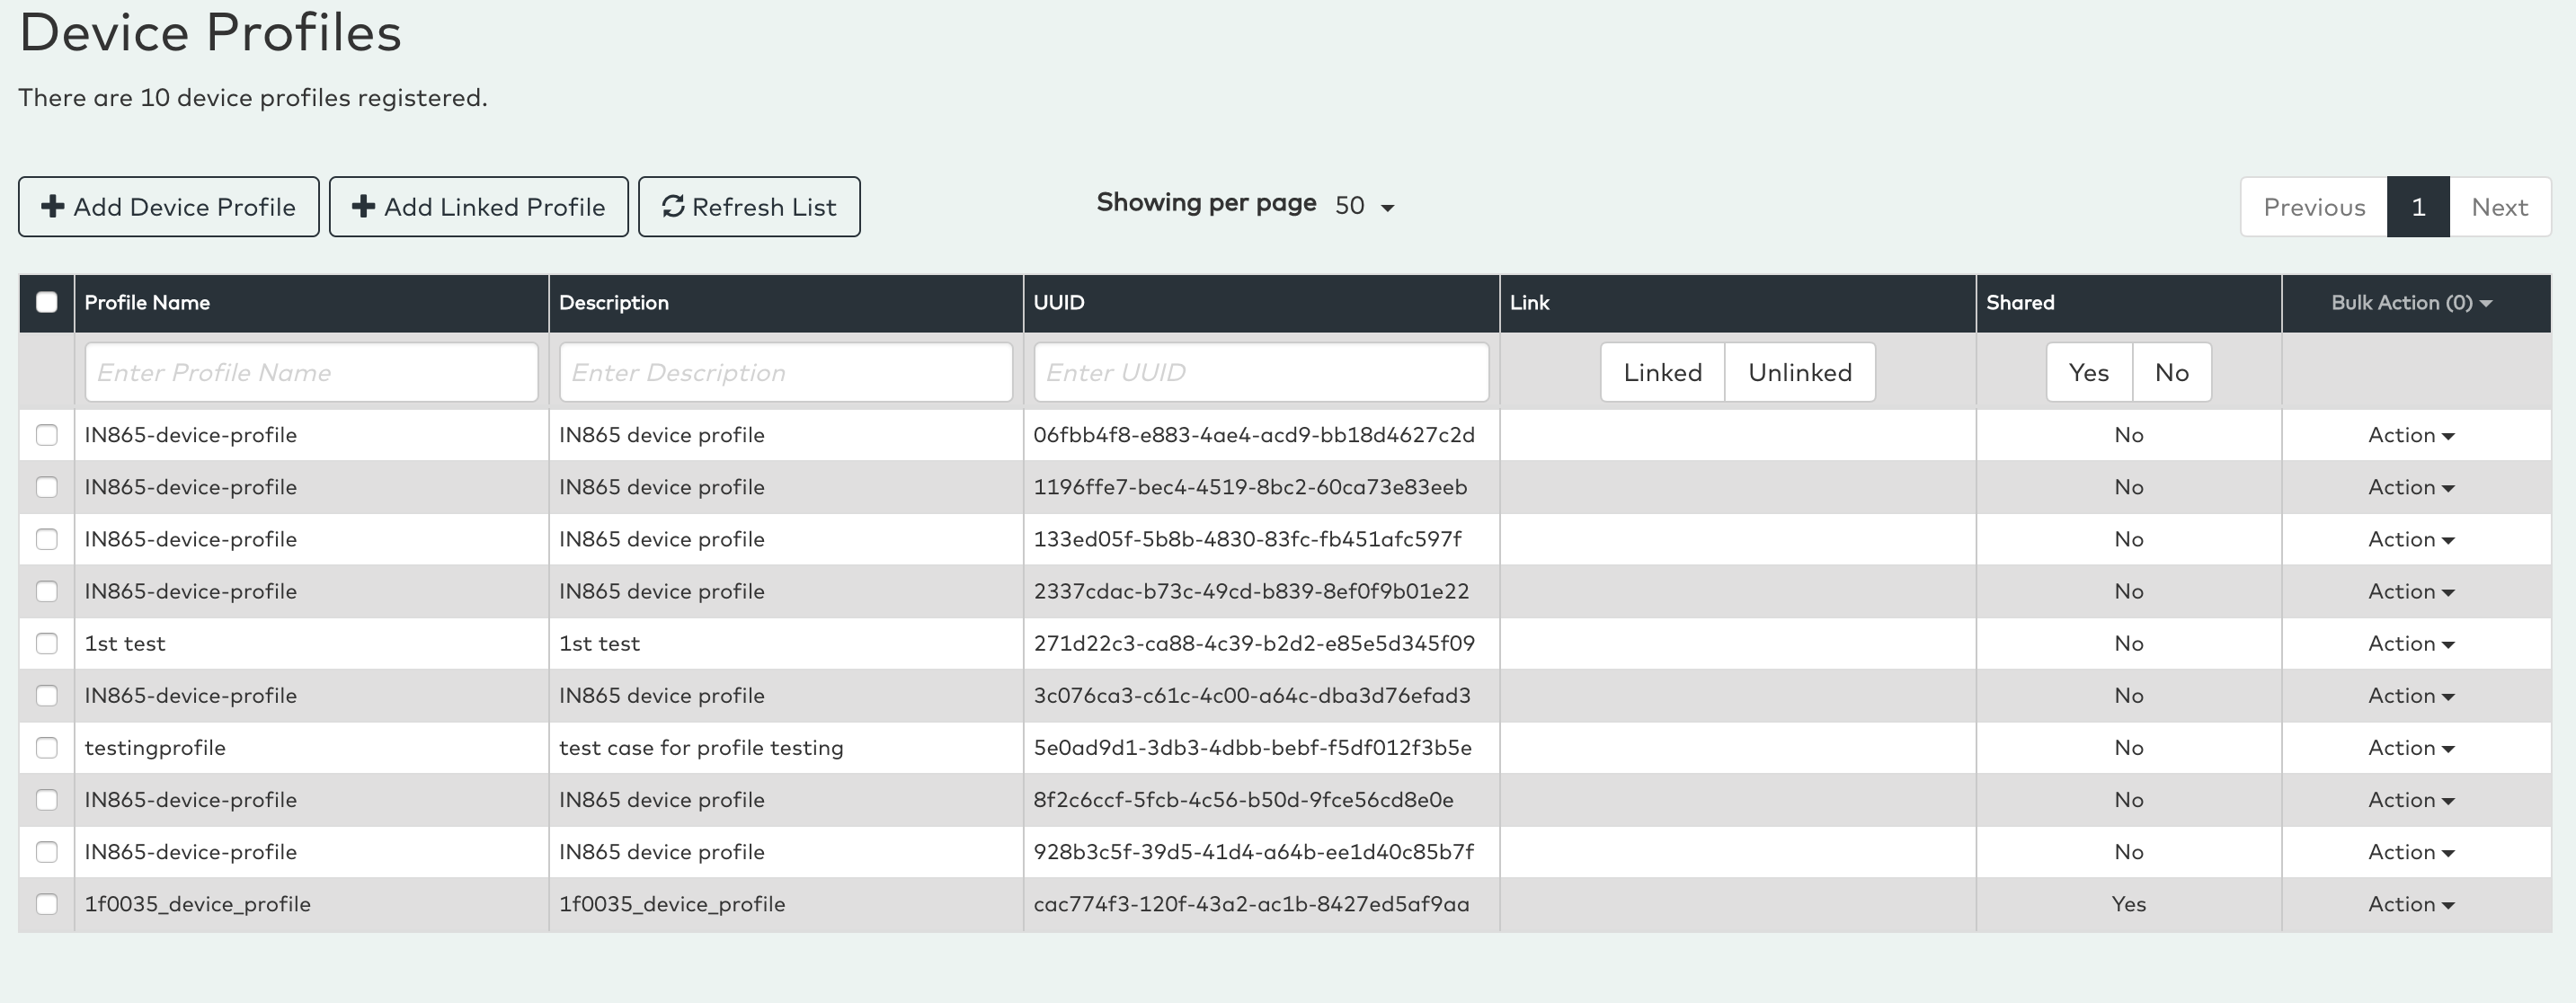
List Device Profiles
We can see the list of device profiles in UI. The list of device profiles can be seen from the following steps:
- Login to UI
- Profiles
- Device Profiles
Modify Device Profiles
We can also edit the device profile from UI. The device profiles can be edited from the following steps:
- Login to UI
- Device Profile
- Action (individual profile)
- Edit Profile -Update the required Values
- Update Profile
Note :- The screens for the Create Device Profile and Edit Device Profile are same.
Delete Device Profiles
We can delete the device profile from UI. The device profiles can be deleted from the following steps:
- Login to UI
- Profiles
- Device Profile
- Action(individual profile)
- Delete Profile
Add Device via Legacy
On clicking the Add Device without profile button brings up the following pop-up window:

The window allows a user to enter all supported parameters for a device. There are many parameters that can be configured; however in the normal cases, only parameters on the first tab need to be provided. All input fields are dynamically checked for validity. The field will have a red frame if the input is invalid and it will turn green when the input is valid.
At the top is the DevEUI field, this field is mandatory and should be filled with DevEUI of the device. The DevEUI can be entered in two formats, compact HEX and standard Lora Alliance format. e.g.:
Compact HEX: 0C170C4300000192
Lora Alliance Format: 0C-17-0C-43-00-00-01-92
The DevEUI value is the only mandatory field that is always required when registering a device.
The Comment field is optional and is used only to assign a comment (e.g. name or description) to the devices. The comment is showed in the device list view for convenience.
The remaining parameters for a device are hidden behind different tabs. The first tab “Keys” is used to select the registration type and (optionally) enter the LoRaWAN keys.
The Registration Type field selects activation mode of the device. There are two modes of registration.
- OTAA: Over The Air Activation
- ABP: Activation By Personalization
If the device is activated via OTAA, please select “OTAA”. In this case the AppKey field is available. This field is optional. If the AppKey is provided, OrbiWAN will manage all aspects of the activation (i.e. the Join procedure) and encryption and decryption for the device and any connected application will be able to receive and send direct clear text messages to the devices.
If the AppKey is not provided, the Join request will be forwarded to a registered application for this account (if available) or can be forwarded to an external join server (if available). If no application or join server is available the device will not be able to join.
The AppKey is a 16-byte HEX sequence and can be entered in either compact HEX format or Lora Alliance format, e.g.:
Compact HEX: C18ABD19506FF201233B781A1987C48F
Lora Alliance Format: C1-8A-BD-19-50-6F-F2-01-23-3B-78-1A-19-87-C4-8F
For a typical OTAA device, once the DevEUI, AppKey and optional Comments have been filled, the registration is complete and normally there is no need to enter any further parameters.
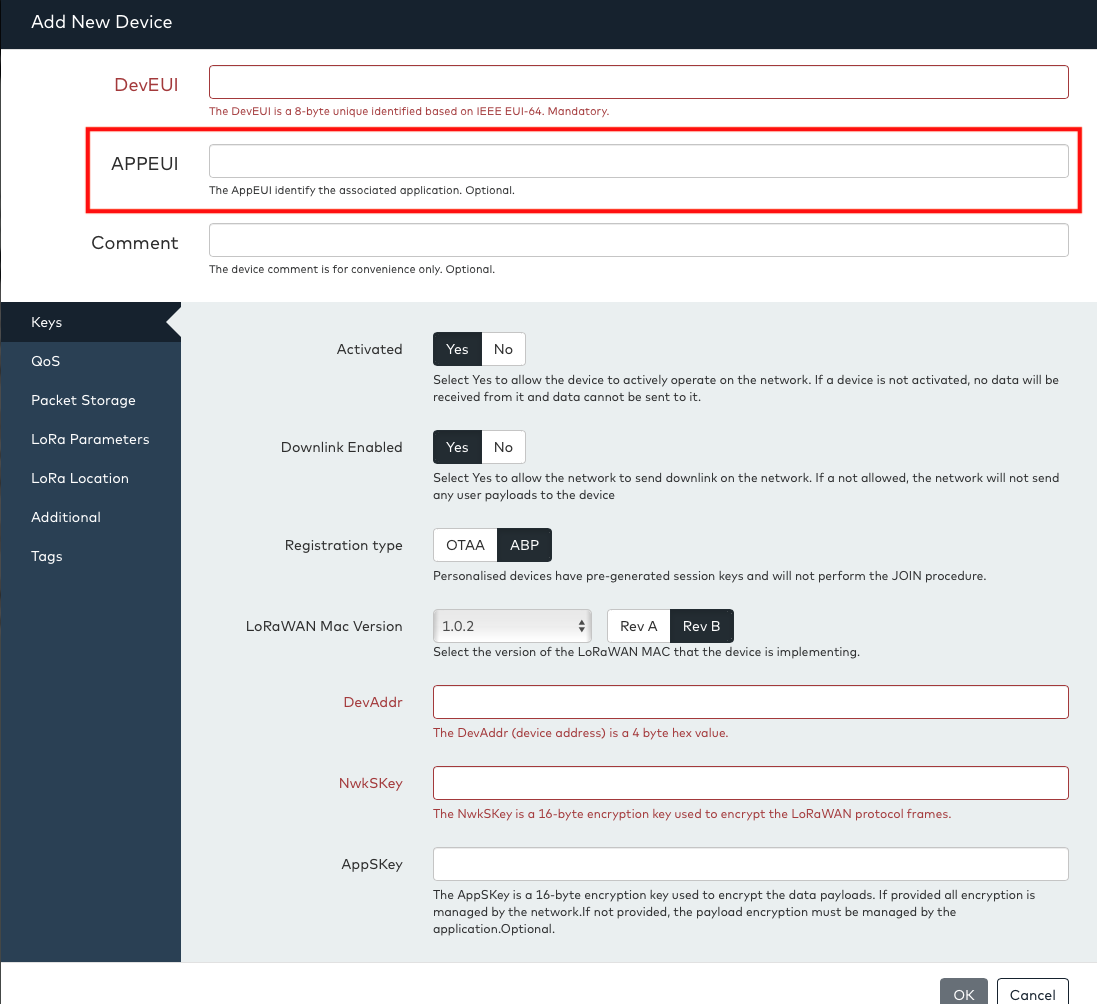
For ABP or personalized devices, please select “ABP” on the Registration Type field. In this case, the key input fields change as shown in the picture below and three new parameters appear
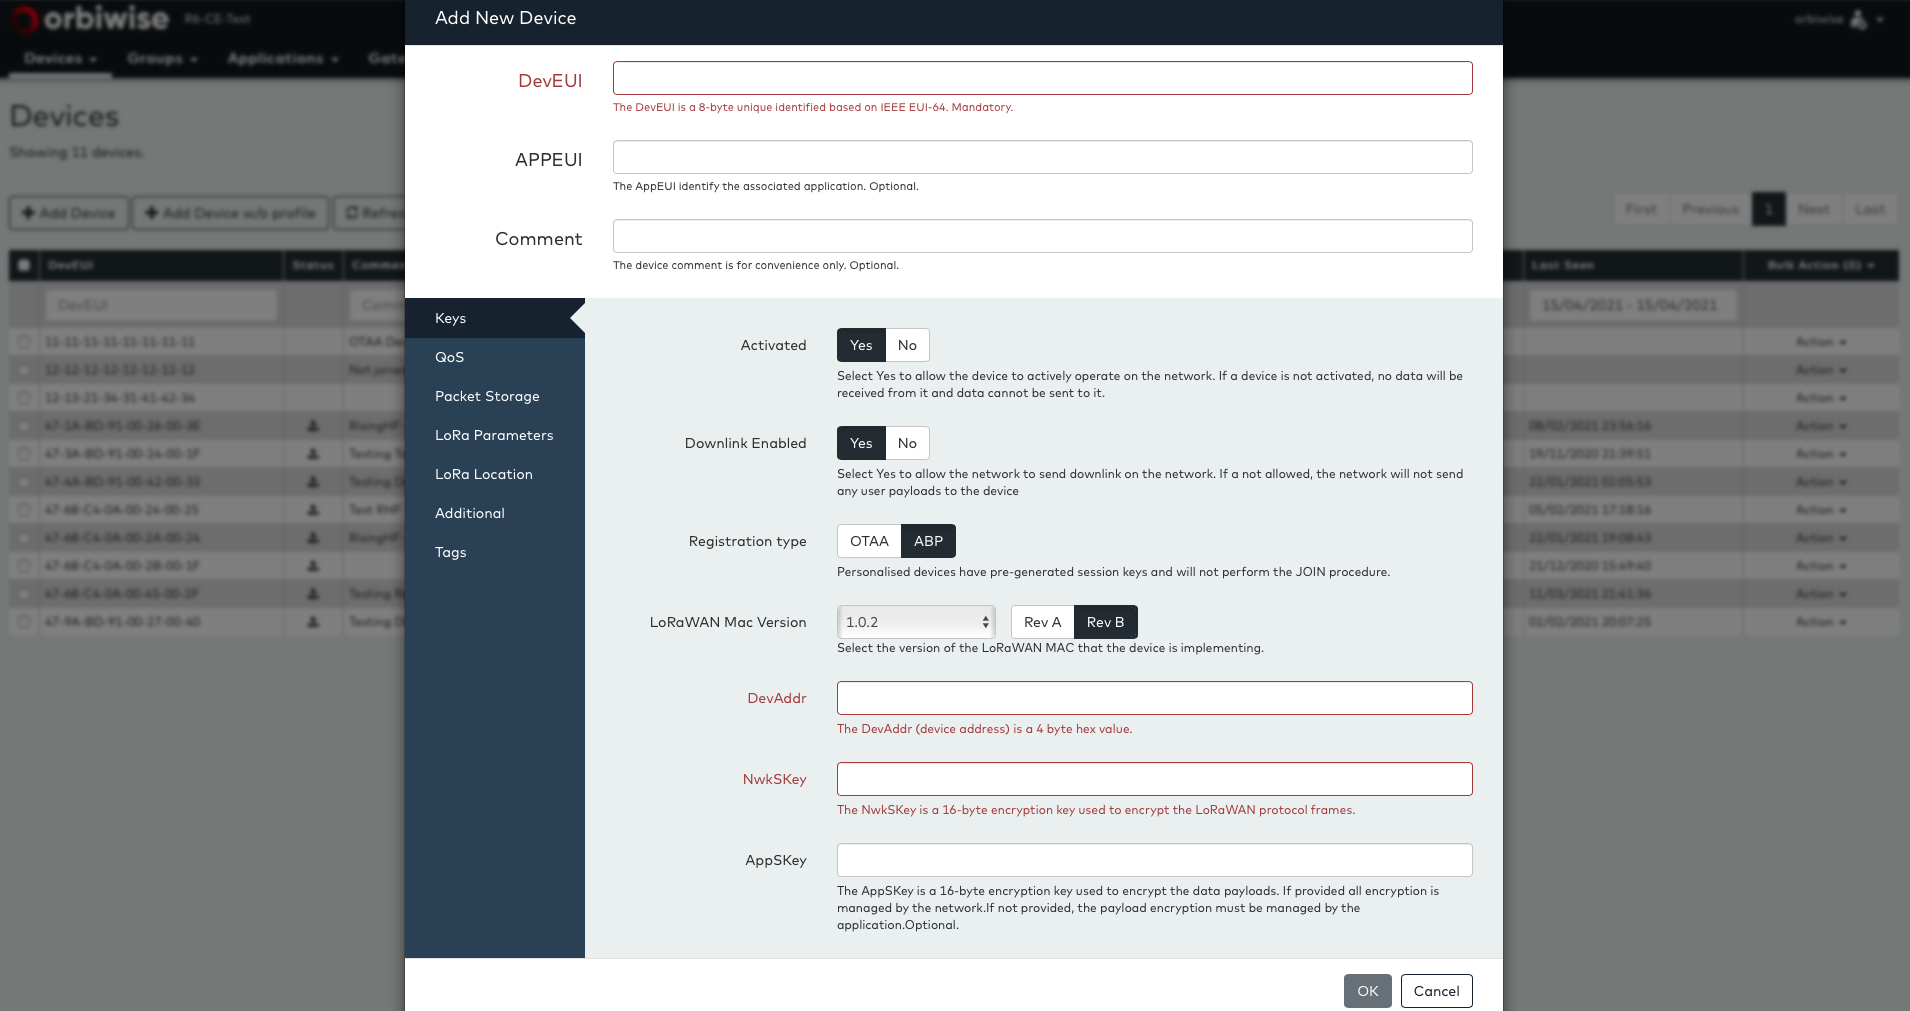
The DevAddr is a 32-bit address that has been pre-flashed into the device in HEX format. This value is mandatory. The format can be in compact HEX or Lora Alliance format, e.g.:
Compact HEX: 1000048F
Lora Alliance Format: 10-00-04-8F
The NwkSKey is the network session key that has been pre-flashed into the device. This value uses the same HEX format as for the AppKey described above. The NwkSKey is mandatory.
The AppSKey is the application session key that has been pre-flashed into the device. The format is like the NwkSKey and AppKey described above. The key is optional and can be omitted if the application is able to perform the encryption. If the key is provided, OrbiWAN will manage all payload encryption for this device and the application can exchange payloads in clear text.
When ABP is chosen, the AppEUI field is always available to fill-in, however it is recommended to not use this field.
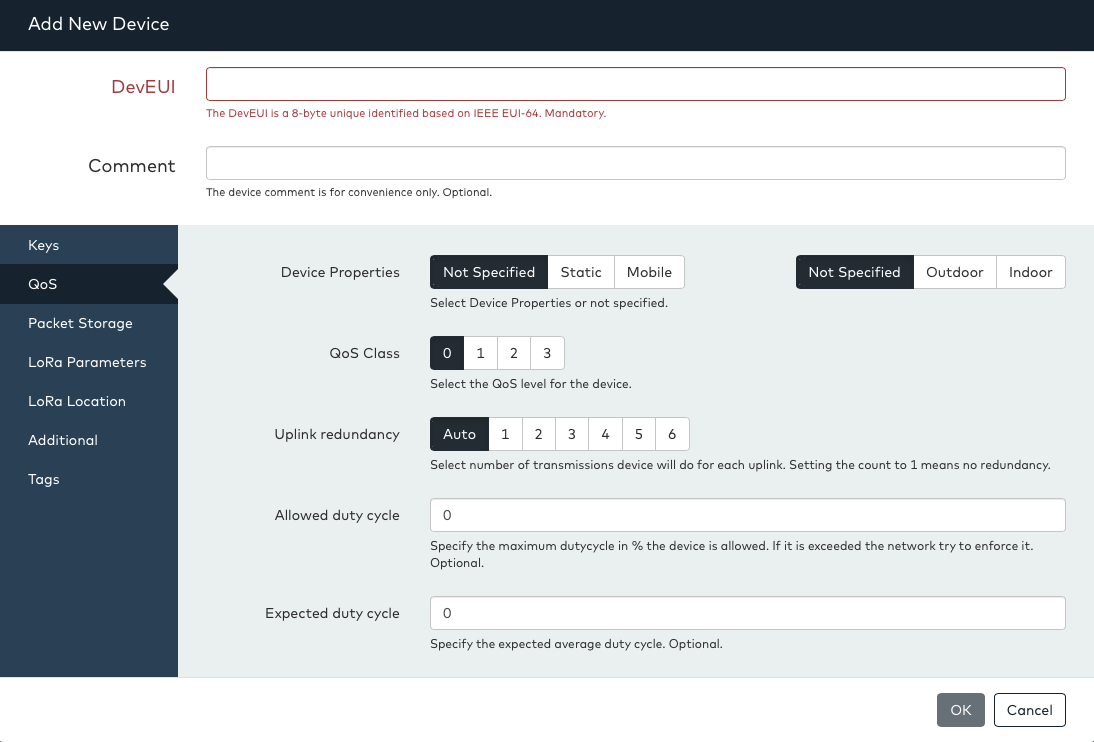
After entering the main parameters on the keys tab, it is sometimes necessary or useful to specify additional parameters for a device. The next tab relates to the Quality of Service (QoS) for the device. This tab allows the specification of properties for the device that helps the network optimize its communication with the device.
-
Device Properties: This field can be used to tell the network whether the device is Static (i.e. not moving) or Mobile (i.e. can move around) and whether the device is located indoors or outdoors. This information can be used by the network to improve its radio link adaptation and improve the precision of the location estimation (when Lora Localization/Geolocation is used). Both parameters are optional.
-
QoS Class field: This field is used to select a predefined QoS class for the device. The meaning of each class is typically defined by the operator and billed differently. The default is always QoS class 0.
-
Uplink Redundancy: This is a parameter that can instruct the network to ask the device to force a certain uplink TX redundancy (as defined in the LoRaWAN specification). This parameter should almost always be left to “auto”.
-
Allowed duty cycle: This parameter can be used to tell the network to instruct the device not to exceed a certain duty cycle (i.e. the amount of time in % the device will transmit). This field can be used if a “standard” device not fully controlled by an application may do more transmission than allowed. In this case, this field can be used and will cause the network to send an instruction to the device to limit the duty cycle. Normally this field should be left empty.
-
Expected duty cycle: This field can be used to enter the expected duty cycle a device will have. This parameter can help the network to identify if there is a problem with the device in case the actual duty cycle is significantly different from the expected rate. Normally this field should be left empty. The QoS tab is shown below:
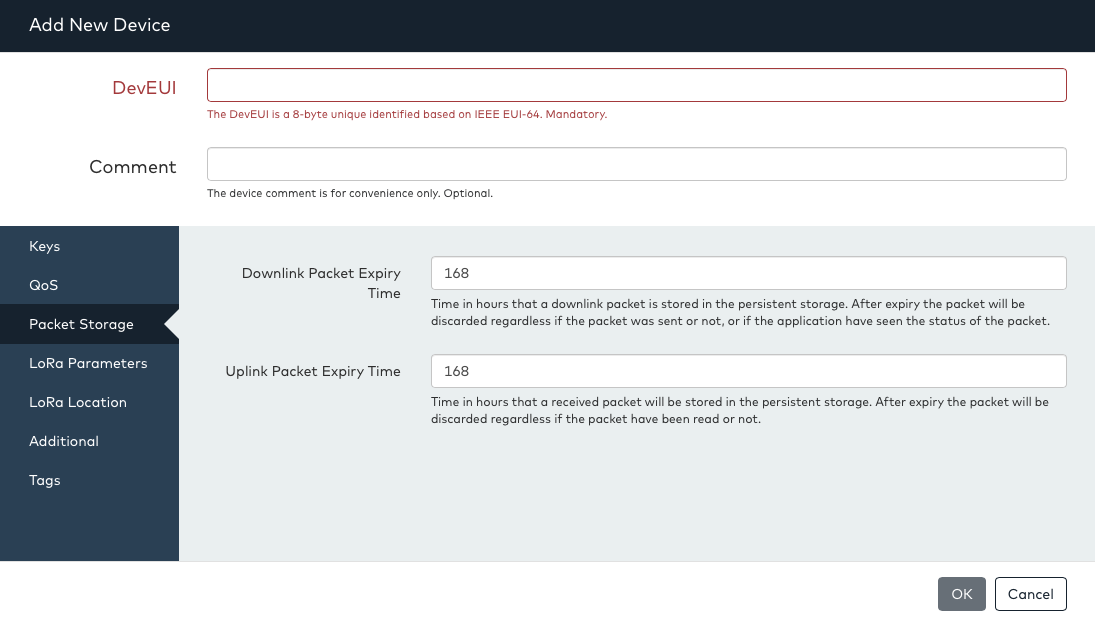
The Packet Storage tabs have parameters that relate to how messages (packets) are stored on the network. When the network receives a message from a device, it is normally forwarded directly to the application. If no application is registered to receive the message, it is stored instead on the network in a temporary storage database.
The message is not stored permanently and after an expiry time the message is automatically flushed from the storage.
The two fields Downlink Packet Expiry Time and Uplink Packet Expiry Time are used to set the duration in hours and the messages are kept in storage for downlink and uplink respectively.
The Packet storage tab is shown below:
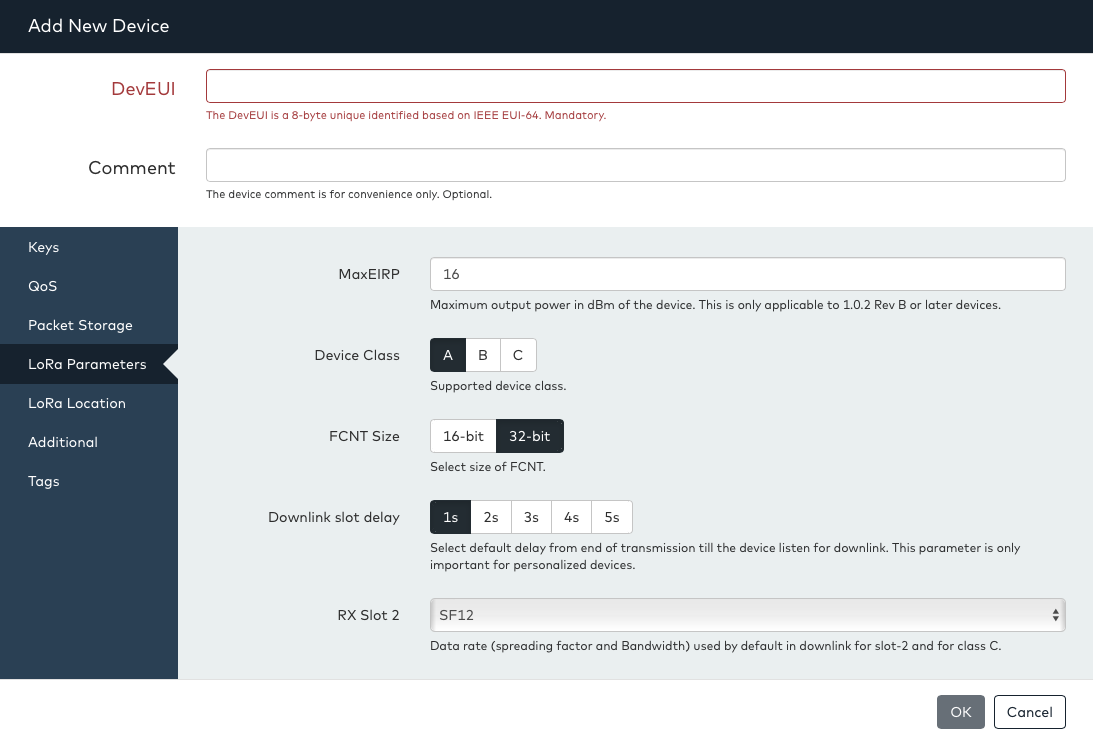
The Lora Parameters tab is used to set certain LoRaWAN related parameters.
-
Device Class: This parameter must be set to select the device class. Note this parameter is often changed again dynamically by the application. Possible classes are A, B and C. Devices that are set to class A mode will only operate in class A mode.
When set to Class B, the network will use class B whenever the device signals that it can use class B. It is therefore safe to set class B even if the device does not support class B. As operators may charge different rates for class B downlink, it may be desirable to select class A in some cases even if the device supports class B.
Class C should only be set when the device is in class C mode (i.e. continuously listening) as the network cannot check the actual status of the device and will send downlink in class C mode. Applications can dynamically change between class A and C via the DASS API.
-
Downlink Slot Delay: This can be used to tell the network what the default TX to RX1 delay is for the device. This is only relevant for ABP devices and is only needed to change in the rare case that the ABP device has not been provisioned with the default values of the network. For OTAA devices this field can be ignored.
-
RX slot 2: This field is similarly used to inform the network what the default RX2 data-rate is for the device. This is only relevant for ABP devices and is only needed to change in the rare case that the ABP device has not been provisioned with the default values of the network. For OTAA devices this field can be ignored.
The LoRa Parameters tab is shown below:
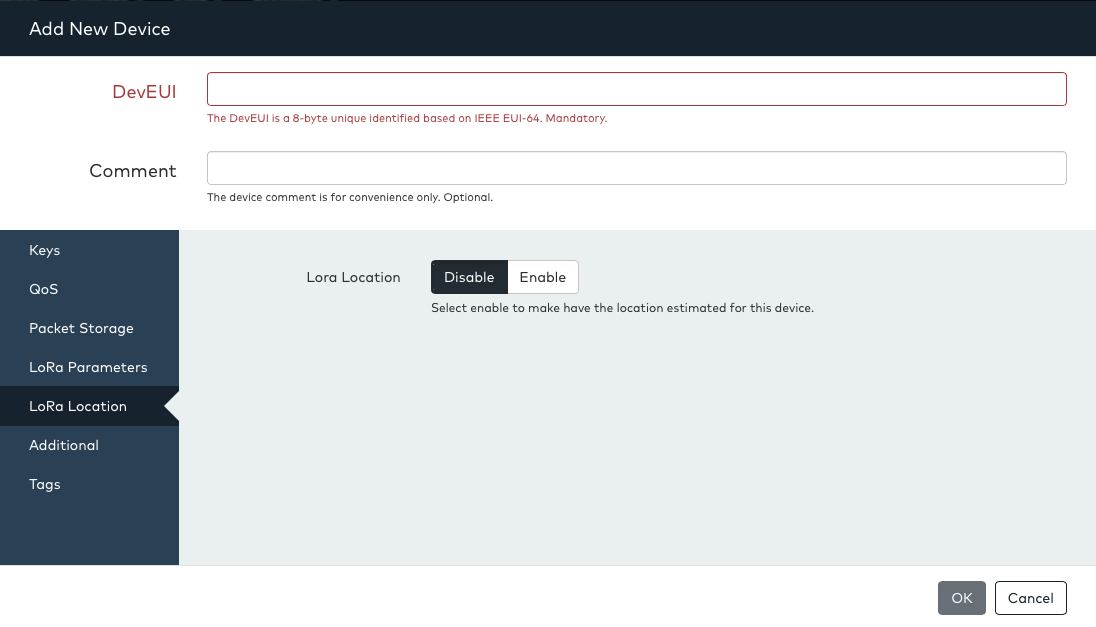
The LoRa Location tab has only one parameter, which is to enable or disable LoRa location for this device. This is only available for accounts that have rights to use LoRa location. Accounts that do not have rights to use LoRa location will not see this tab.
When Lora location is enabled for the device, the network will automatically calculate the position of the device. The location estimate can be seen from the DASS-UI in the map view. The figure below shows the LoRa Location tab:
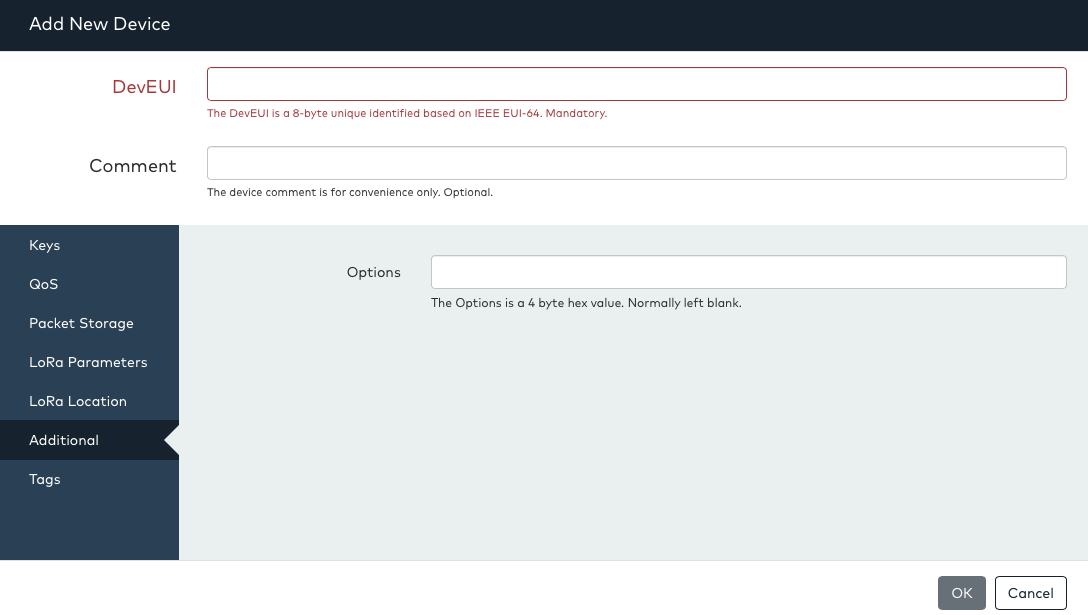
The last tab is the Additional tab. In this tab, there is only one “options” field. This field should normally be left empty, but can in rare cases be used to register devices that require special treatment in the network. Please refer to Orbiwise support for more information on which devices require special treatment and what values to use.
The Additional tab is shown below:
When all parameters have been correctly set and all are valid (i.e. no fields are marked as “red”), press Add Device to complete the registration of the device.
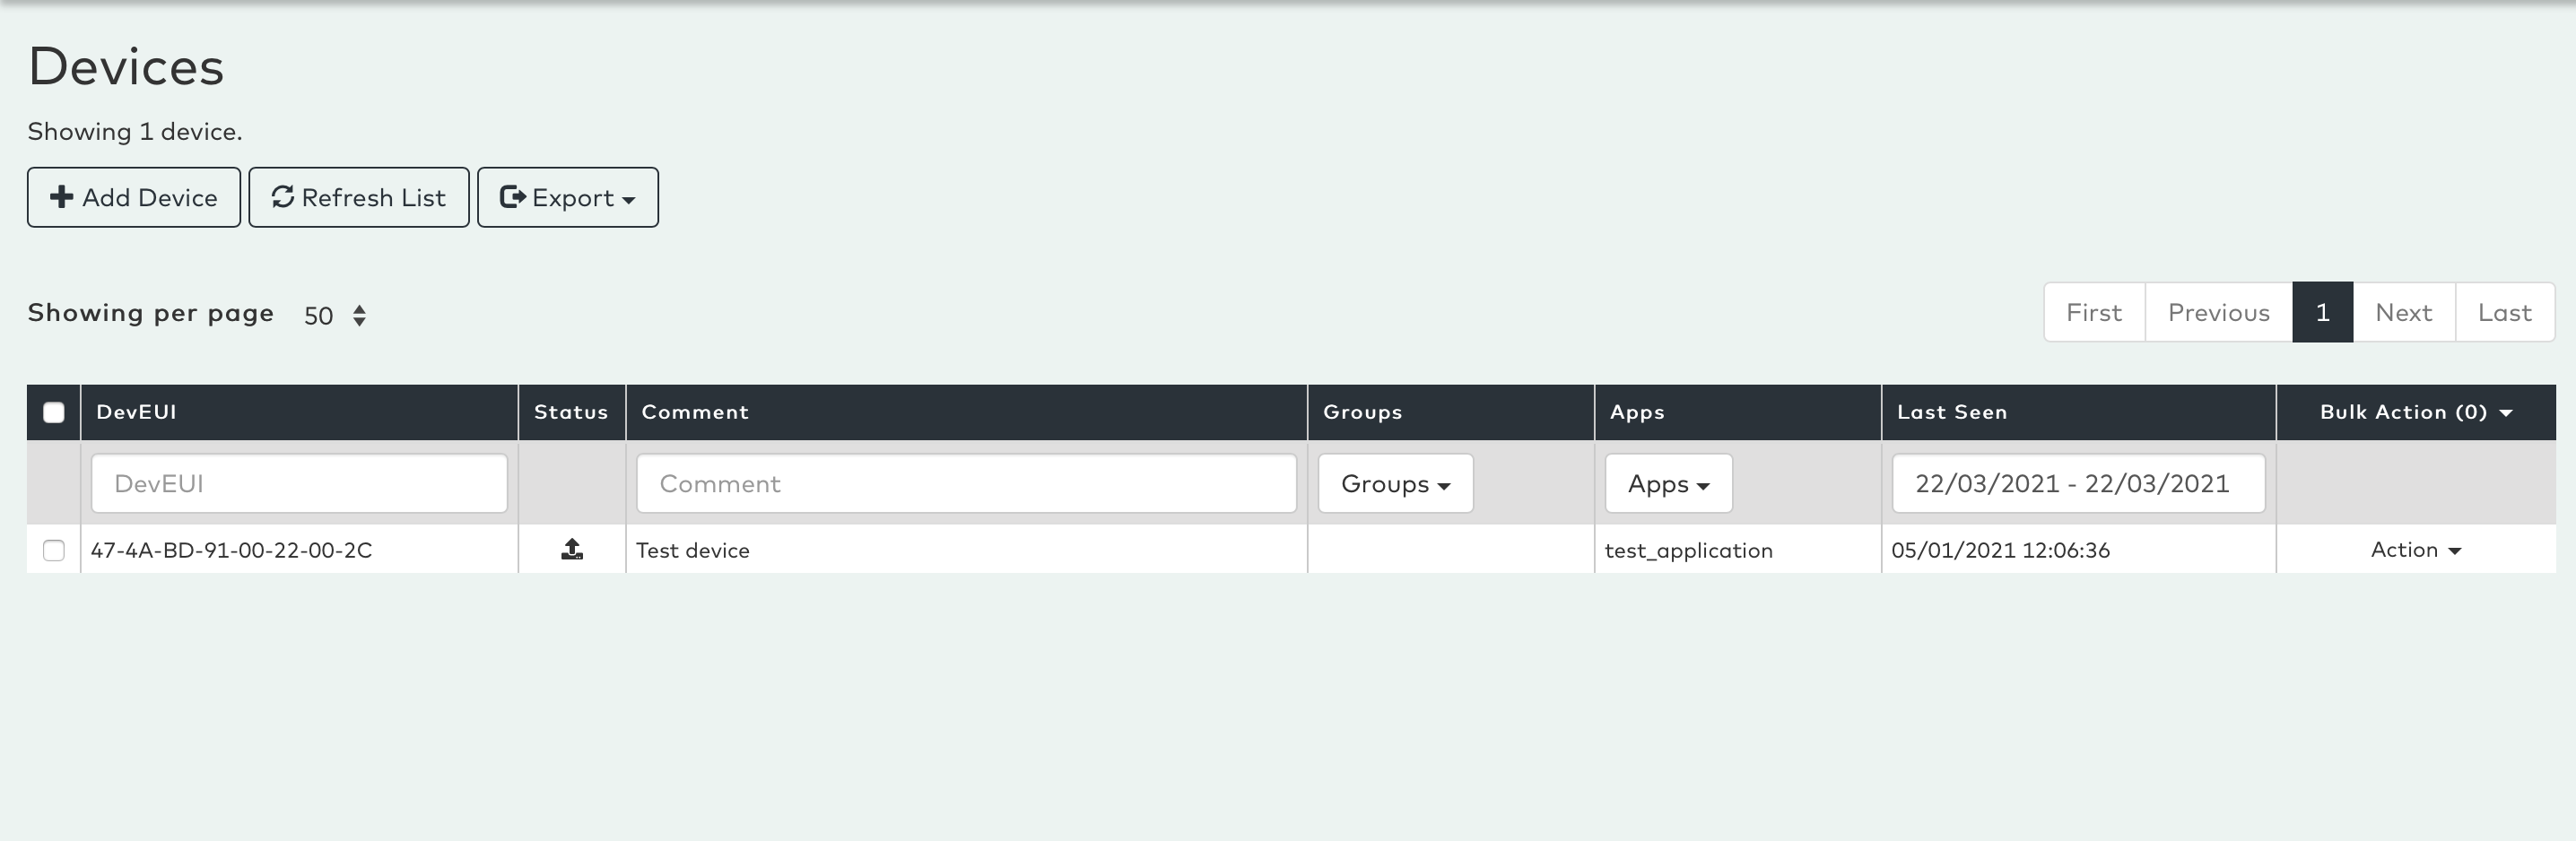
After the window closes, the device should become visible in the device list. It may be necessary to press “Refresh List” to reload the list if the device is not immediately visible.
Device Join via ABP Activation Mode (Legacy)
Device Join via OTAA Activation Mode (Legacy)
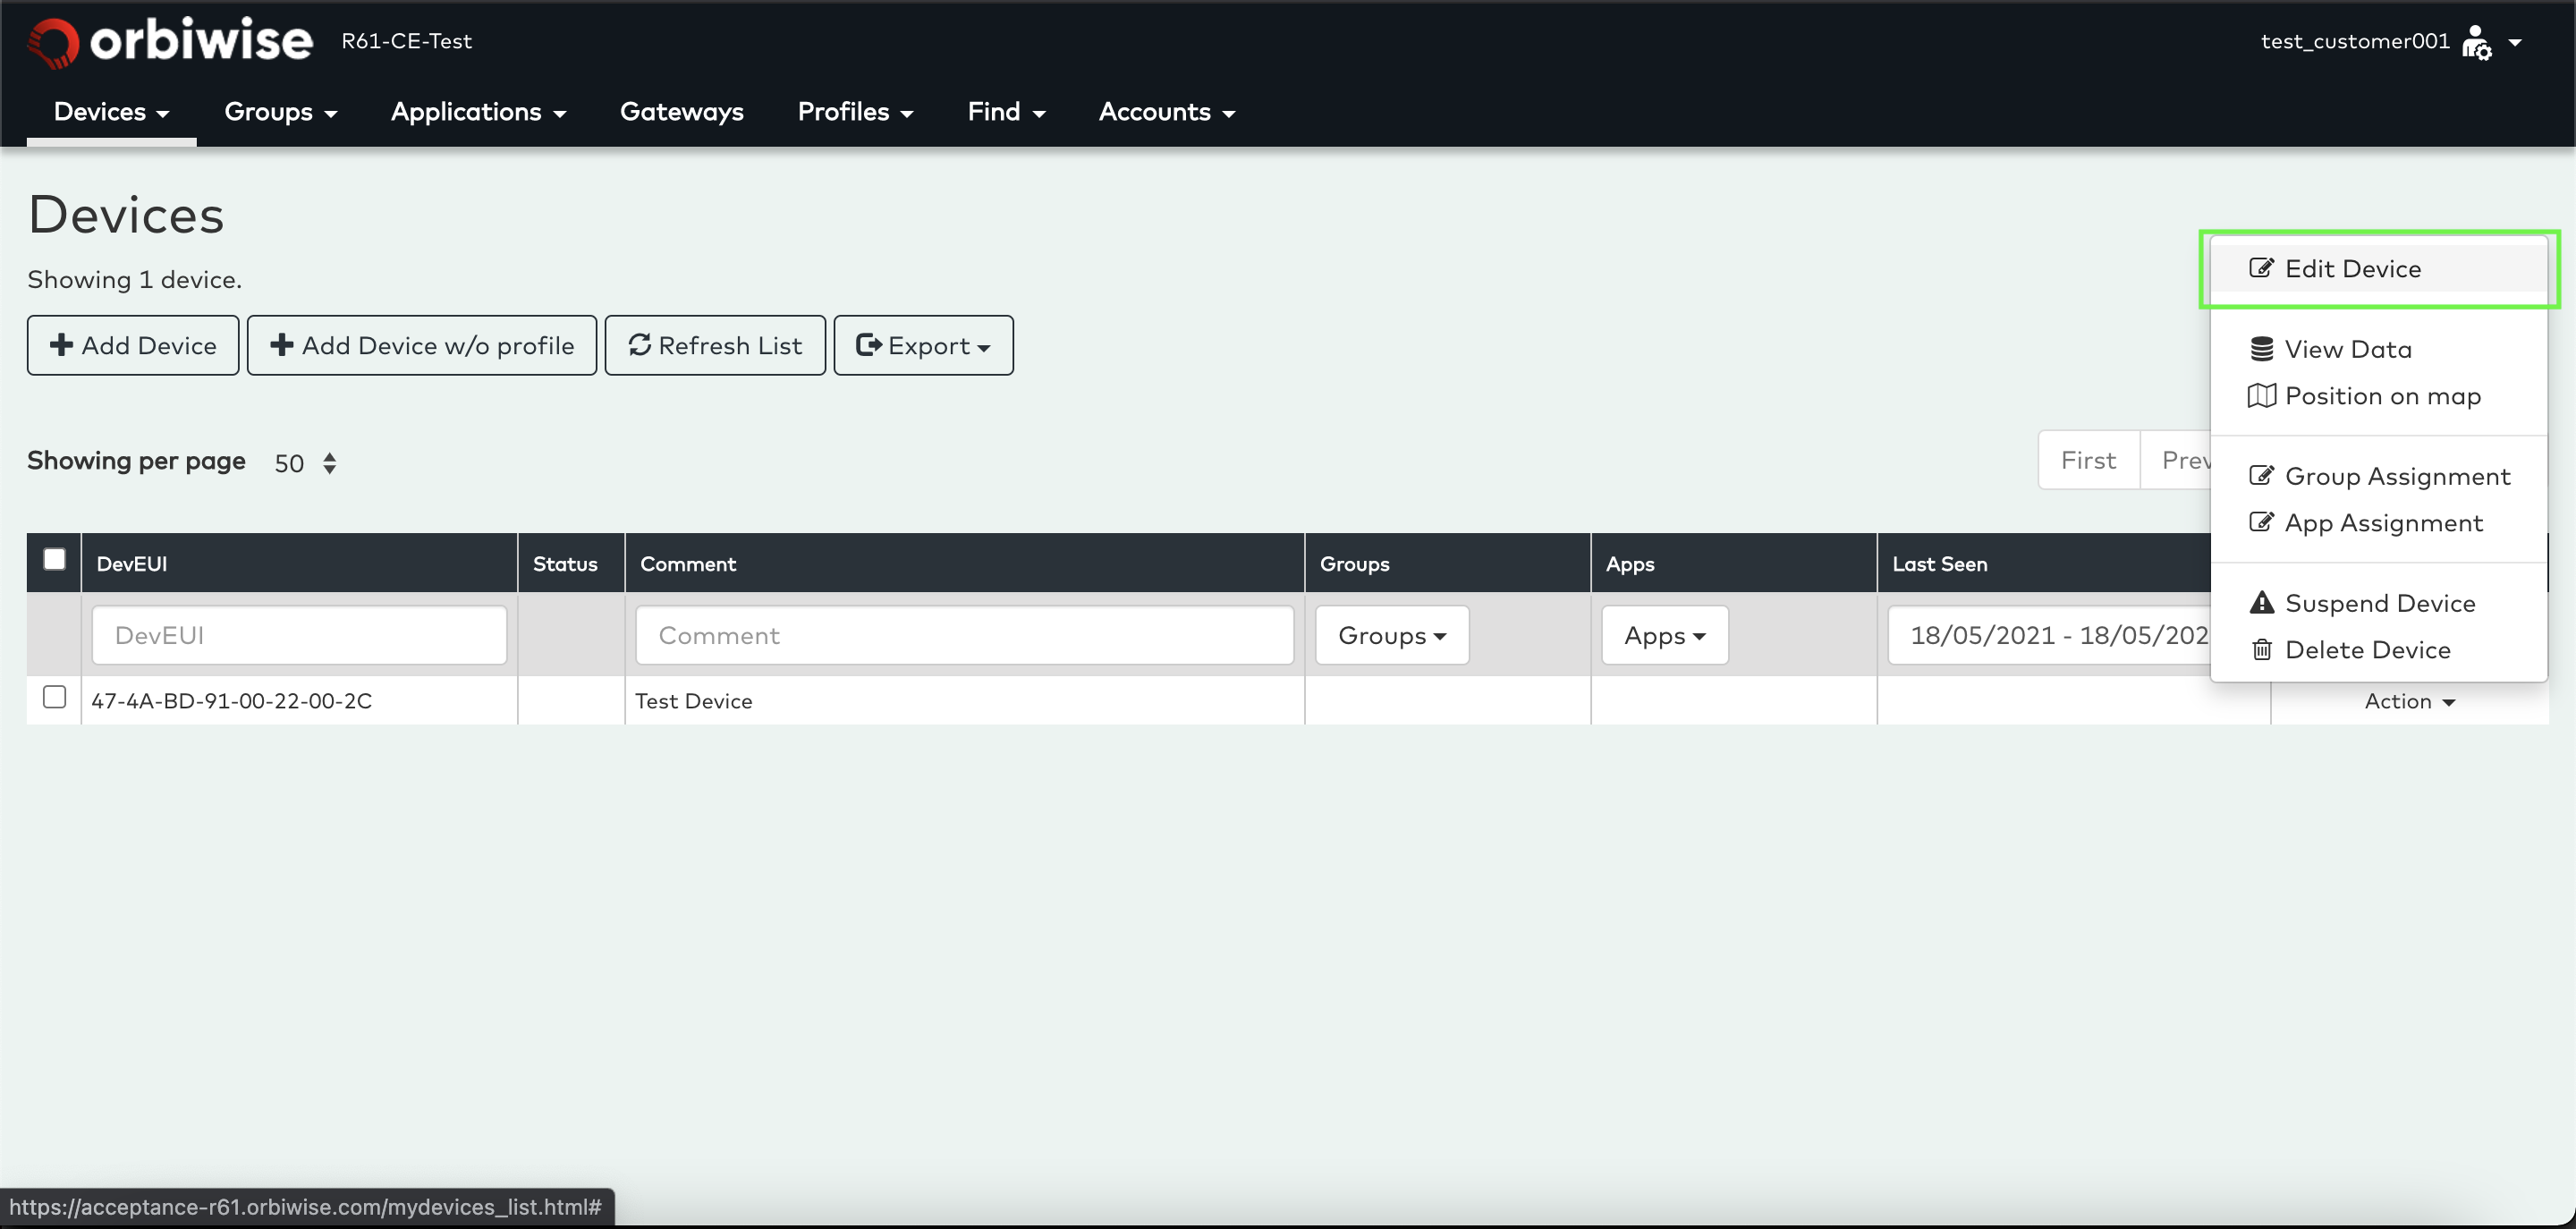
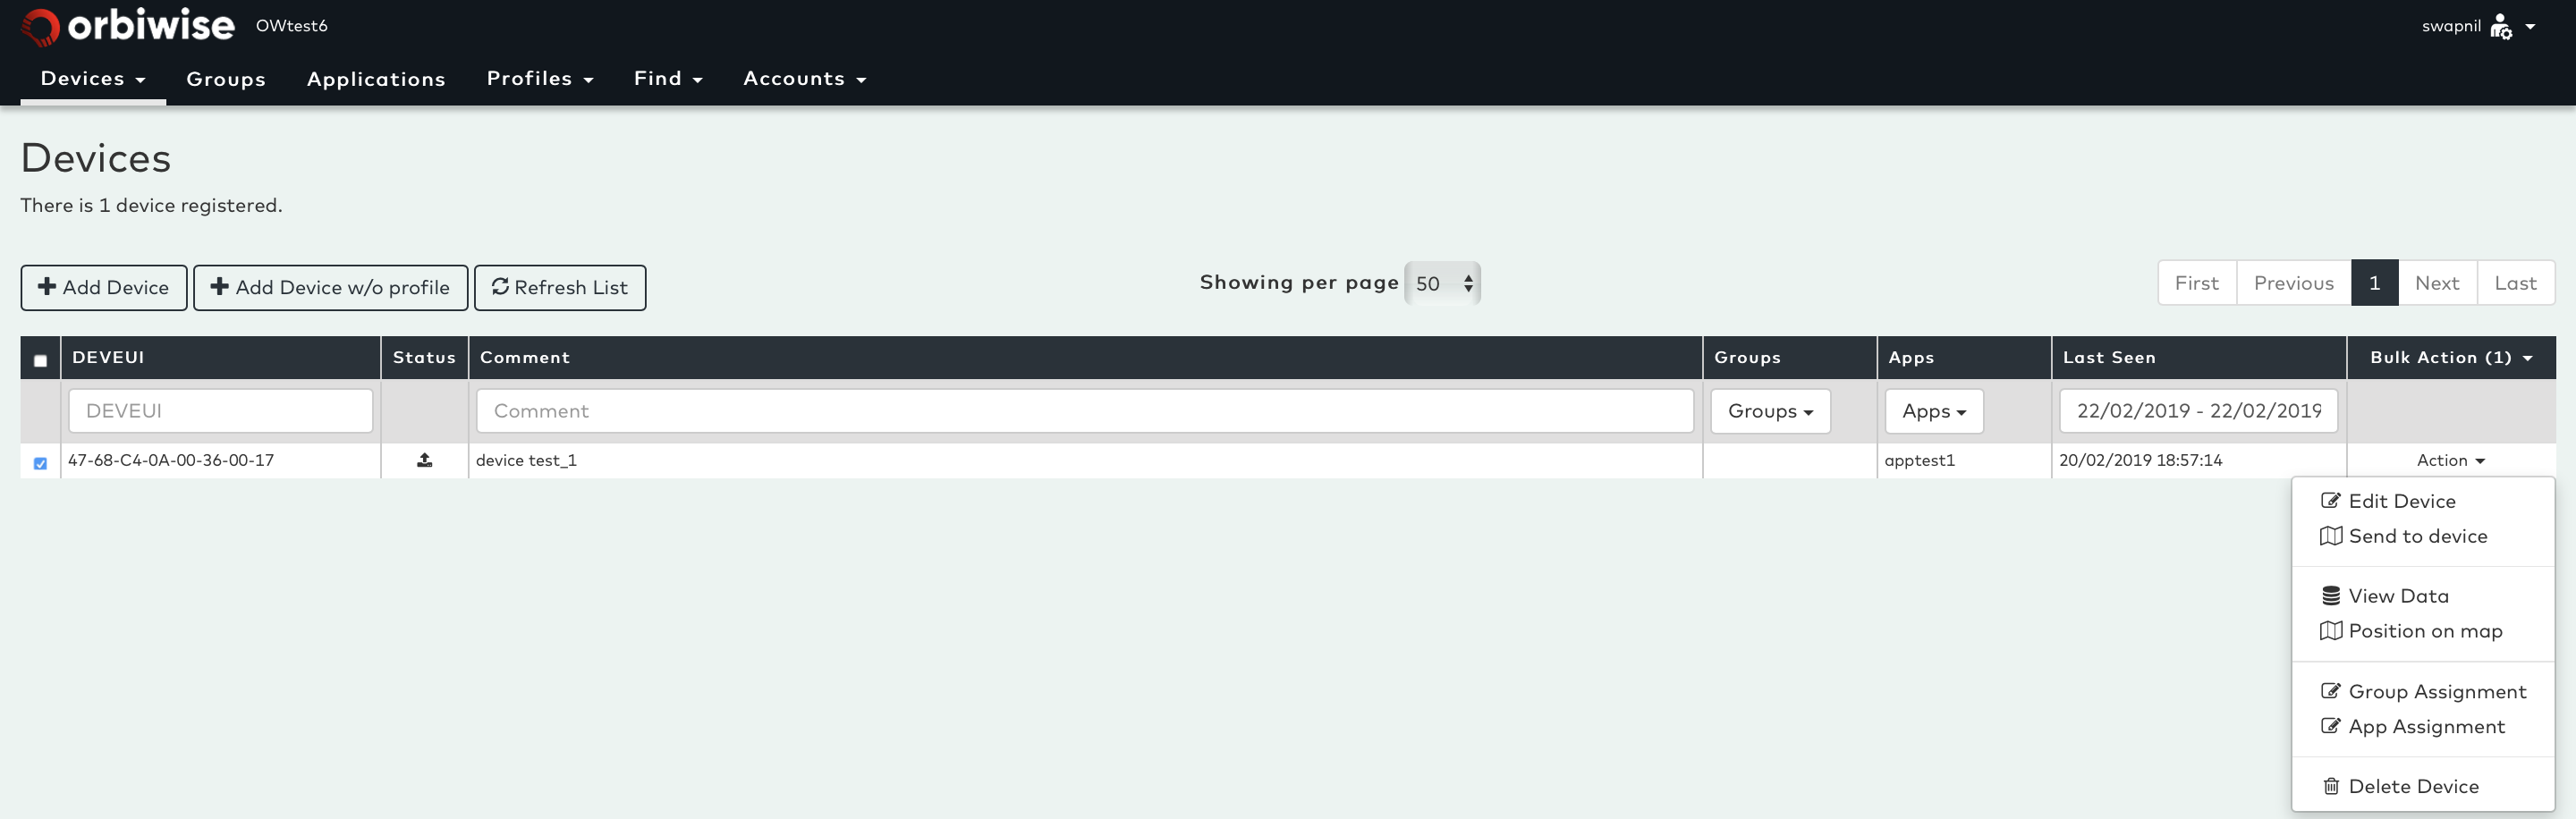
Edit device from UI
- Select Edit Device option from dropdown in the device list as described in below figure:
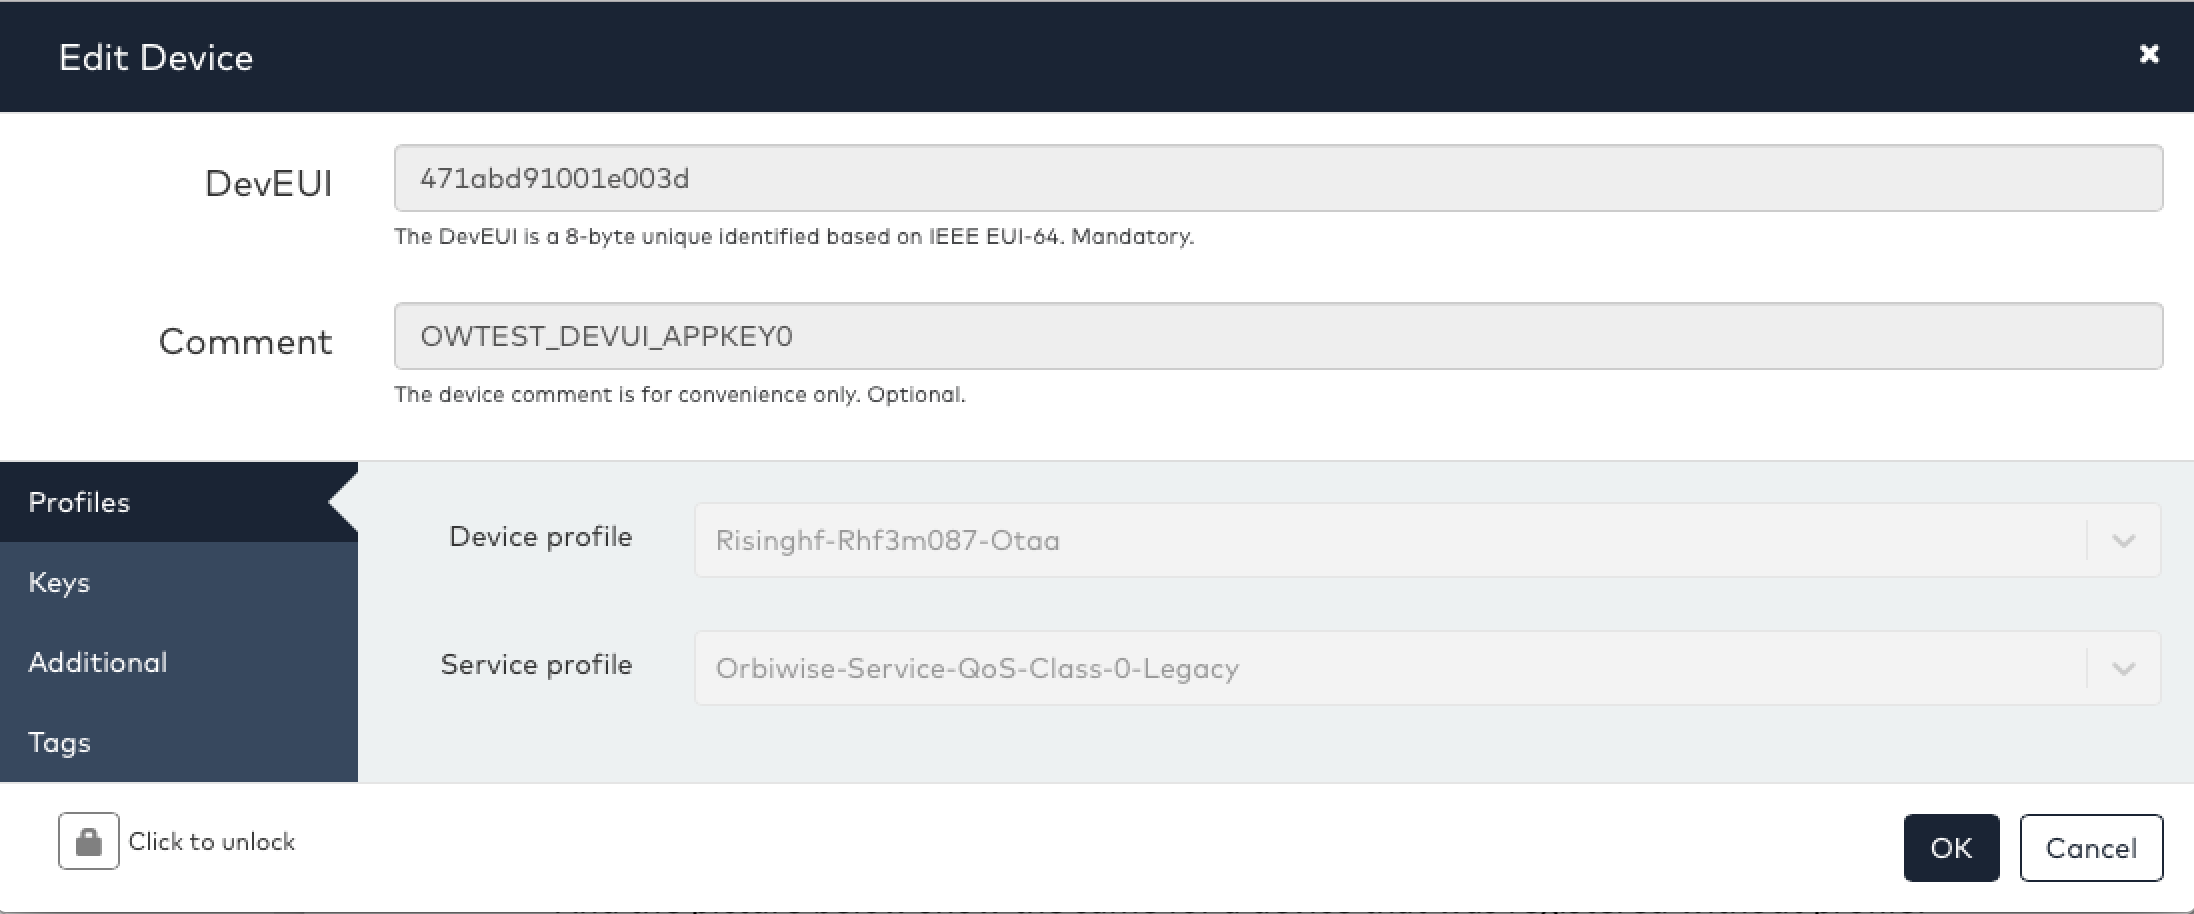
- This will open the same window as for the Add Device (or Add device without Profile depending on the mode of registration) but with the values filled-in and in Read-Only” mode except for the Comment field. A padlock symbol at the bottom left of the page indicates that the values are locked (read-only). See picture below for profile based device:
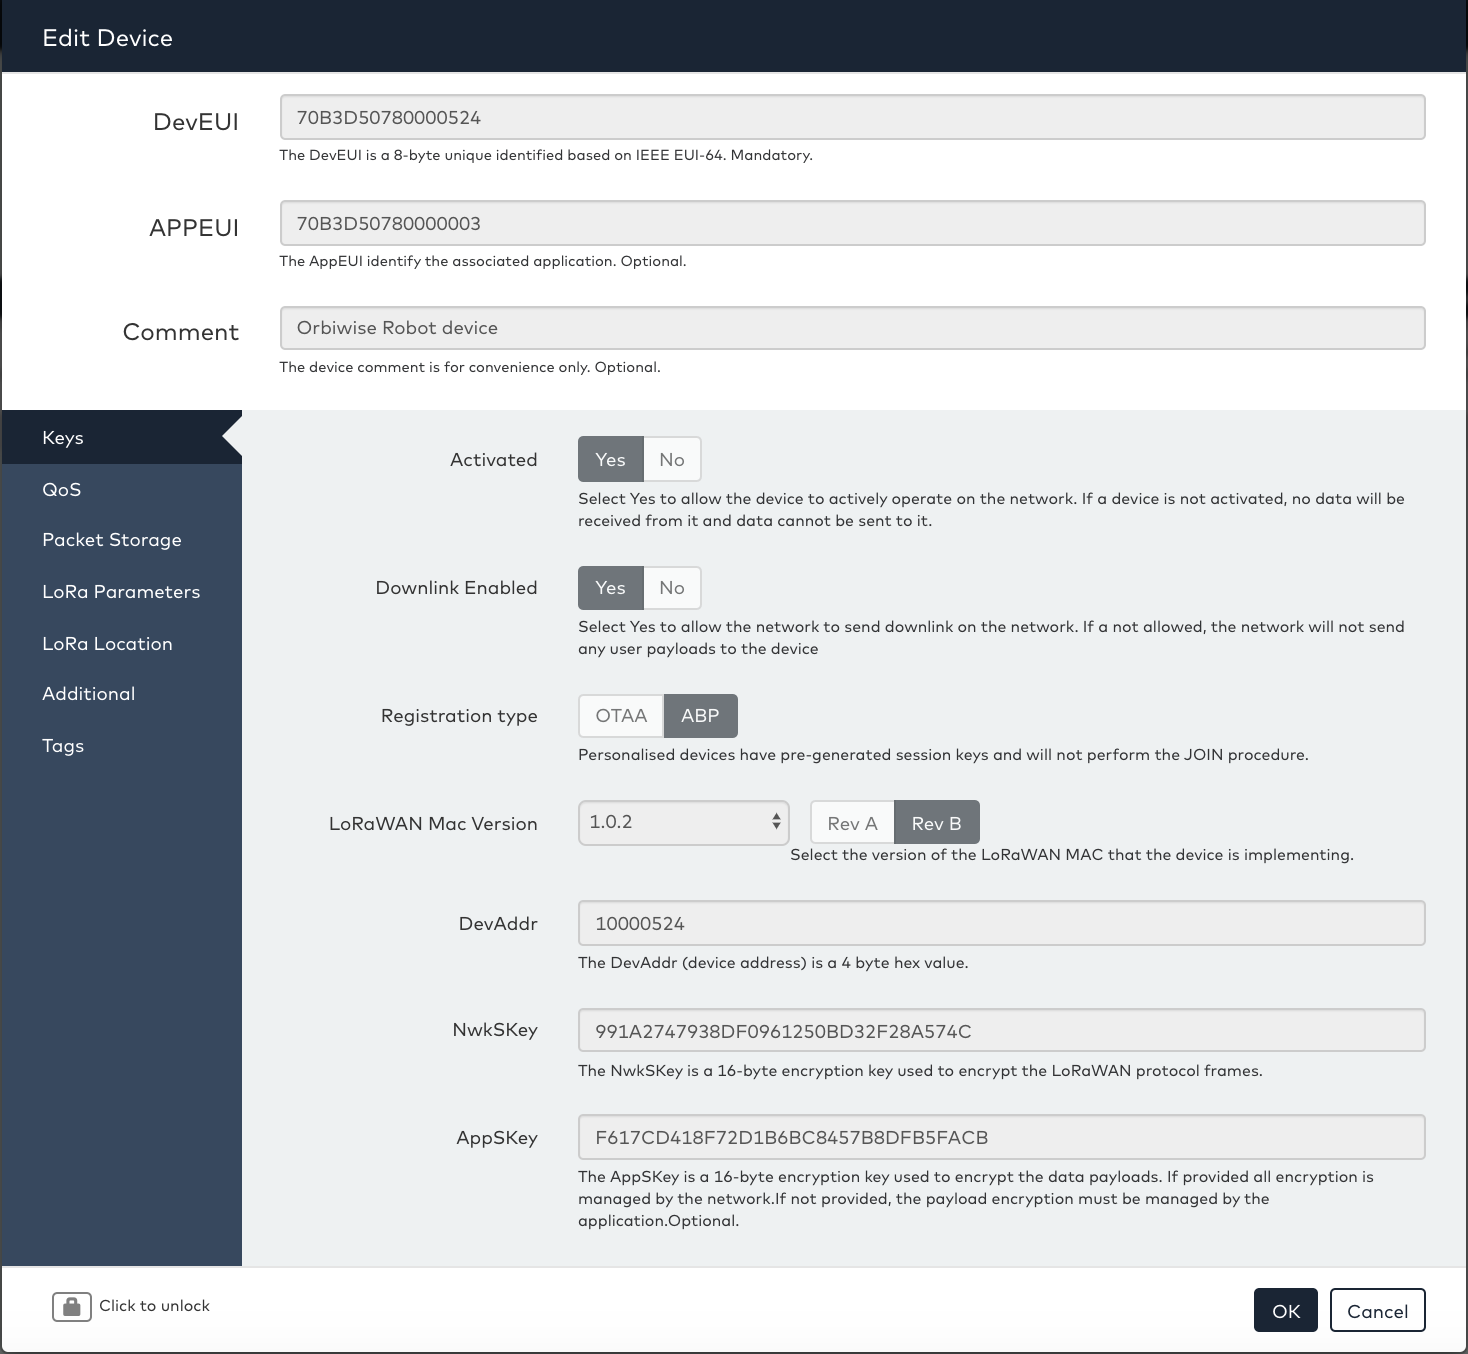
- And the picture below show the same for a device that was registered without Profile:
-
To modify any value (other than the comment field), click on the padlock symbol to unlock the fields. Once the device has been unlocked the values can be changed. The values that have been changed will be highlighted with a green frame.
-
Invalid input values are marked with a red frame and it will not be possible to accept the changes and update the device until all changed settings are valid (and in green) or reset to the unchanged state.
-
Once the changes are complete press Update Device to apply the changes.
-
A new window will pop up to confirm that the change has been applied.
You can also watch the following video to see the Device Activity process in action:
Device Activity
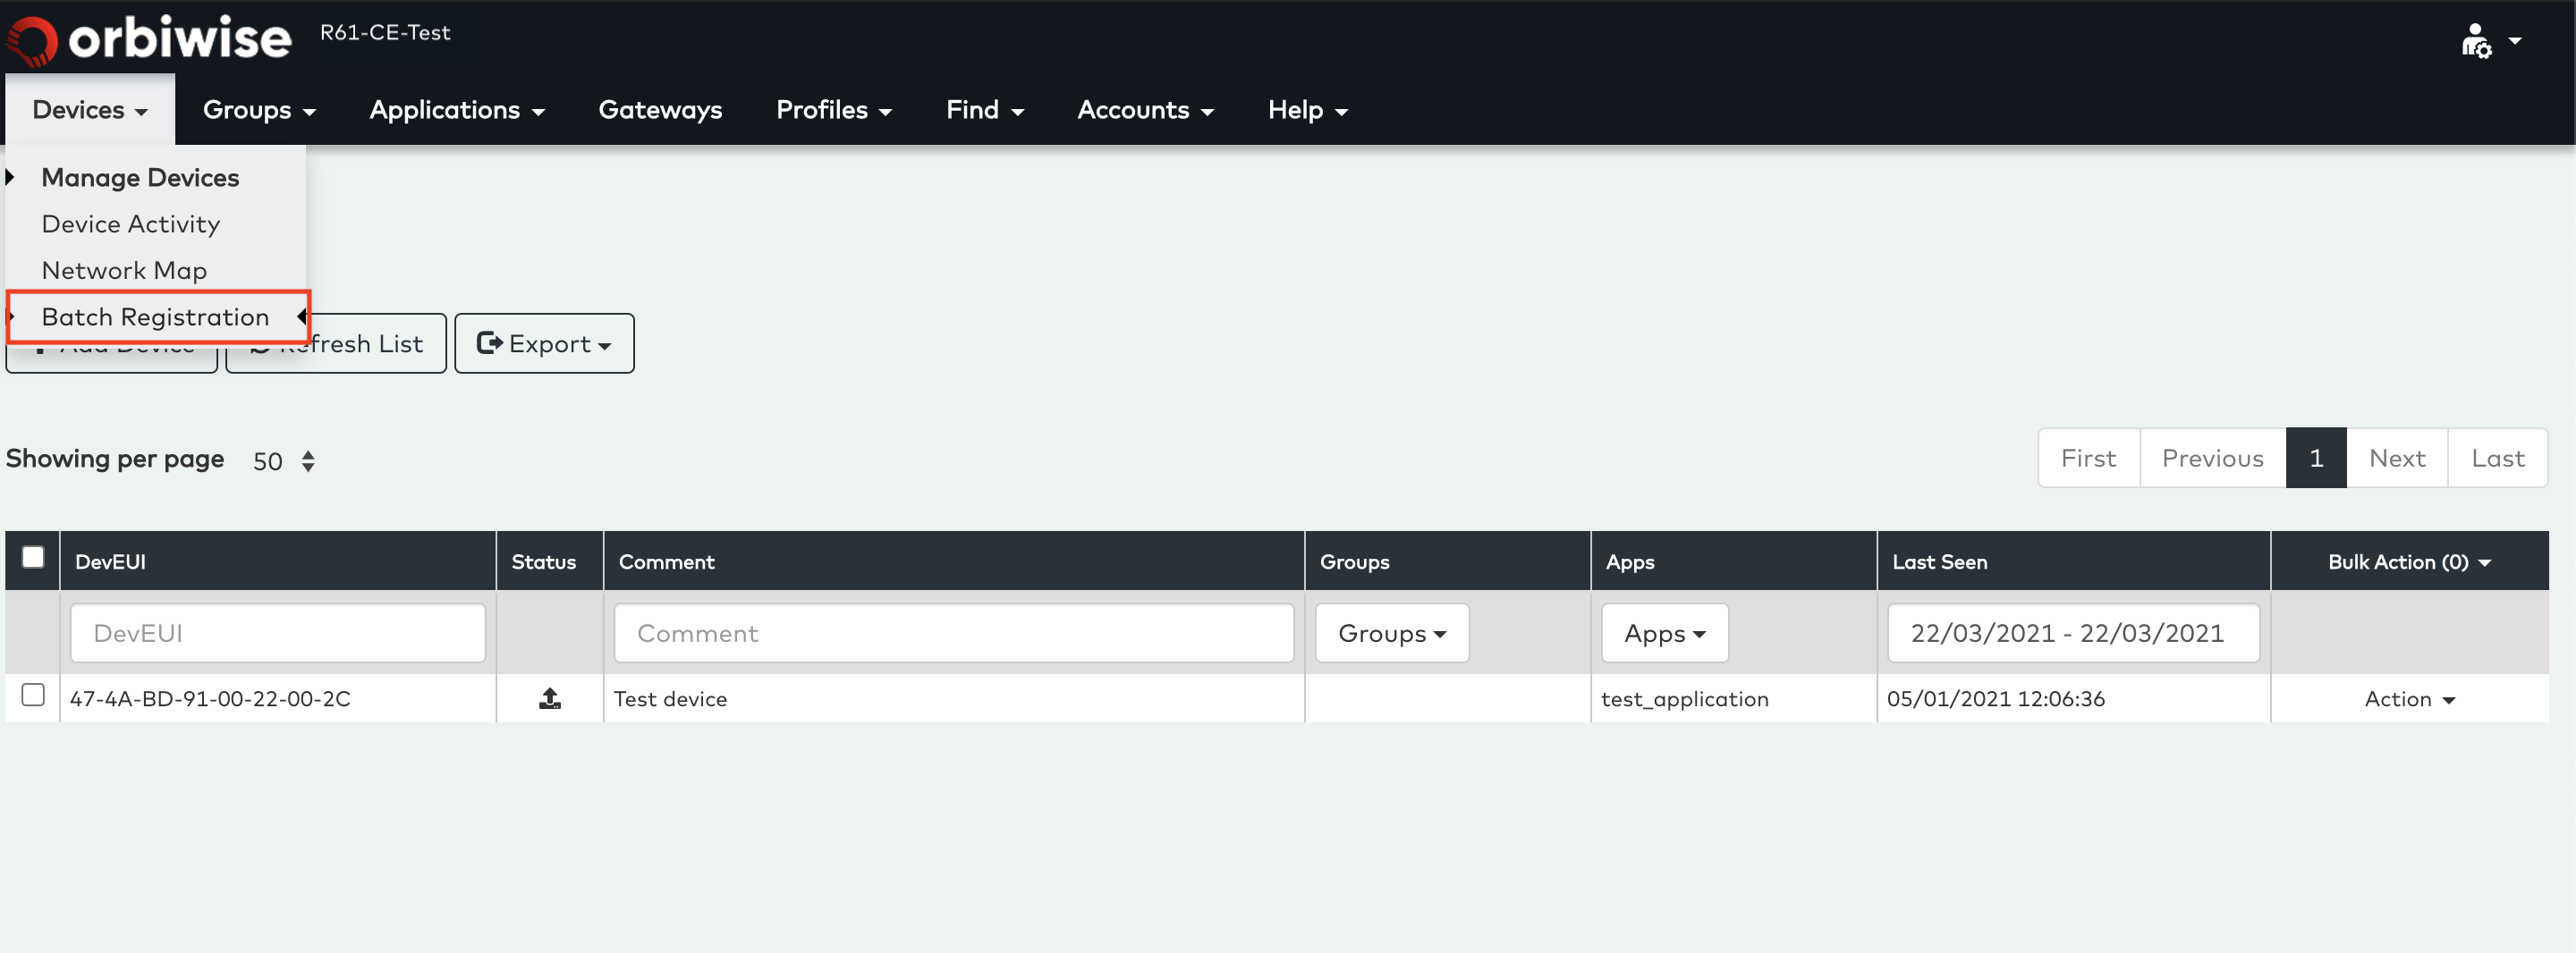
Batch Registration
When many devices must be registered, it is not practical to manually add each device individually via the Add Device UI.
To register many devices in one operation, the UI provides a batch registration feature. Select Batch registration from the Devices dropdown menu to go to the batch registration view.
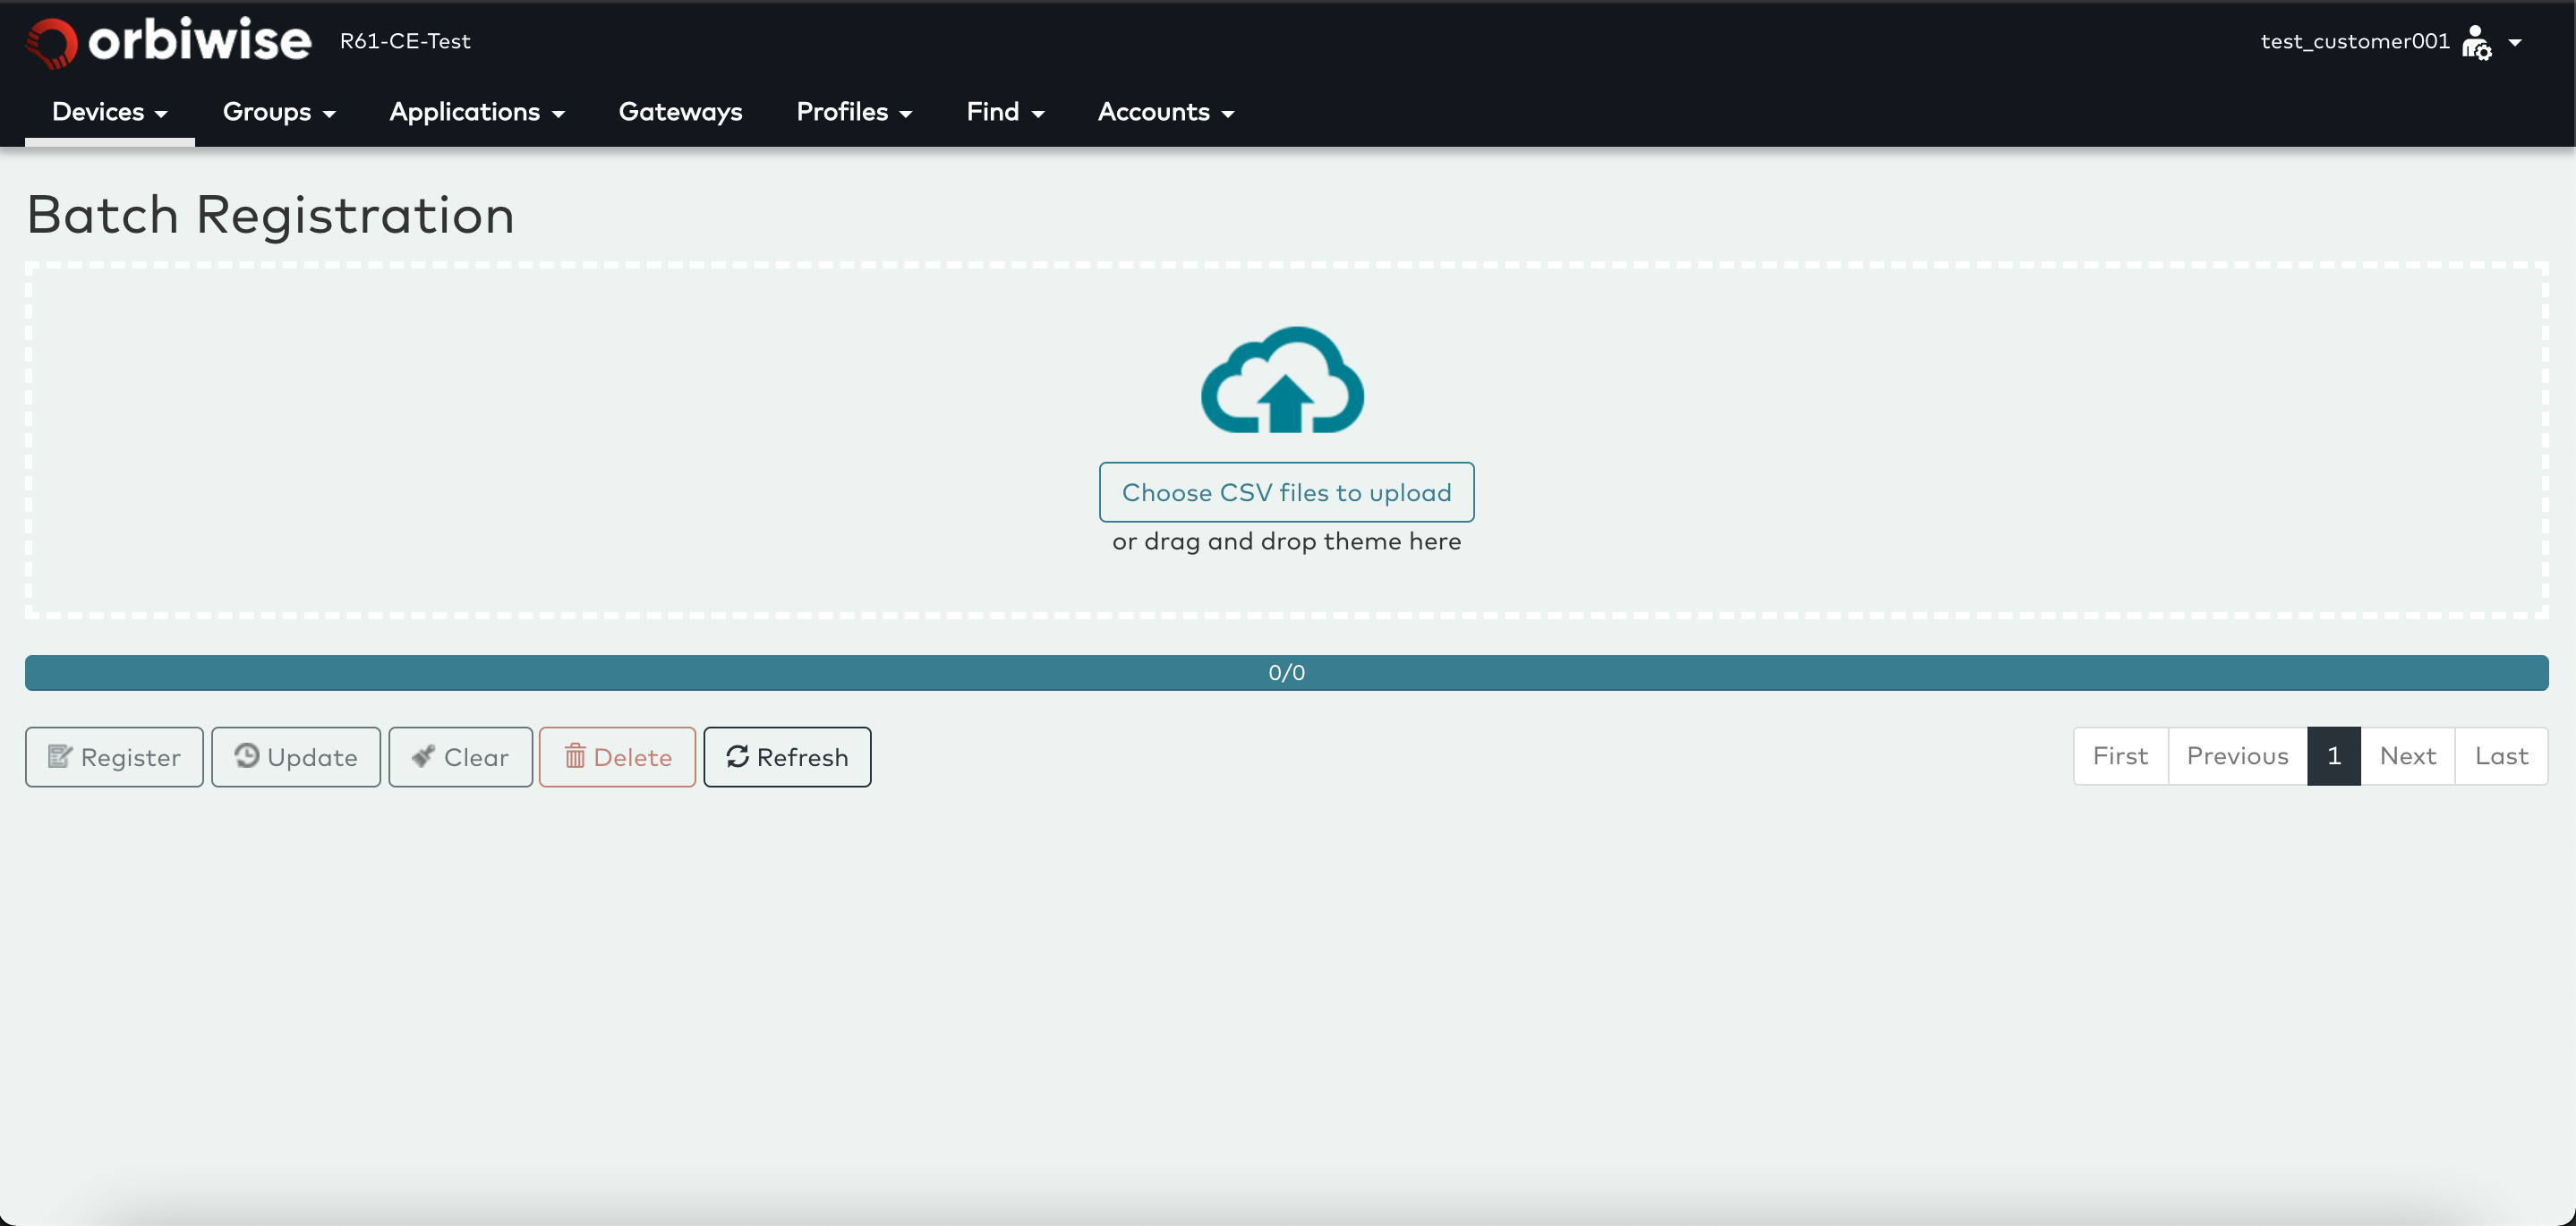
The batch registration view has a file drop zone at the top where a CSV can be dragged and dropped. It is also possible to click on the drop zone to open a file explorer to select the file.
The batch registration view with the file drop zone is shown below.
Once a file has been selected or dropped in the drop zone, the file is uploaded and analysed, then a list with devices and their status is shown. See figure below.
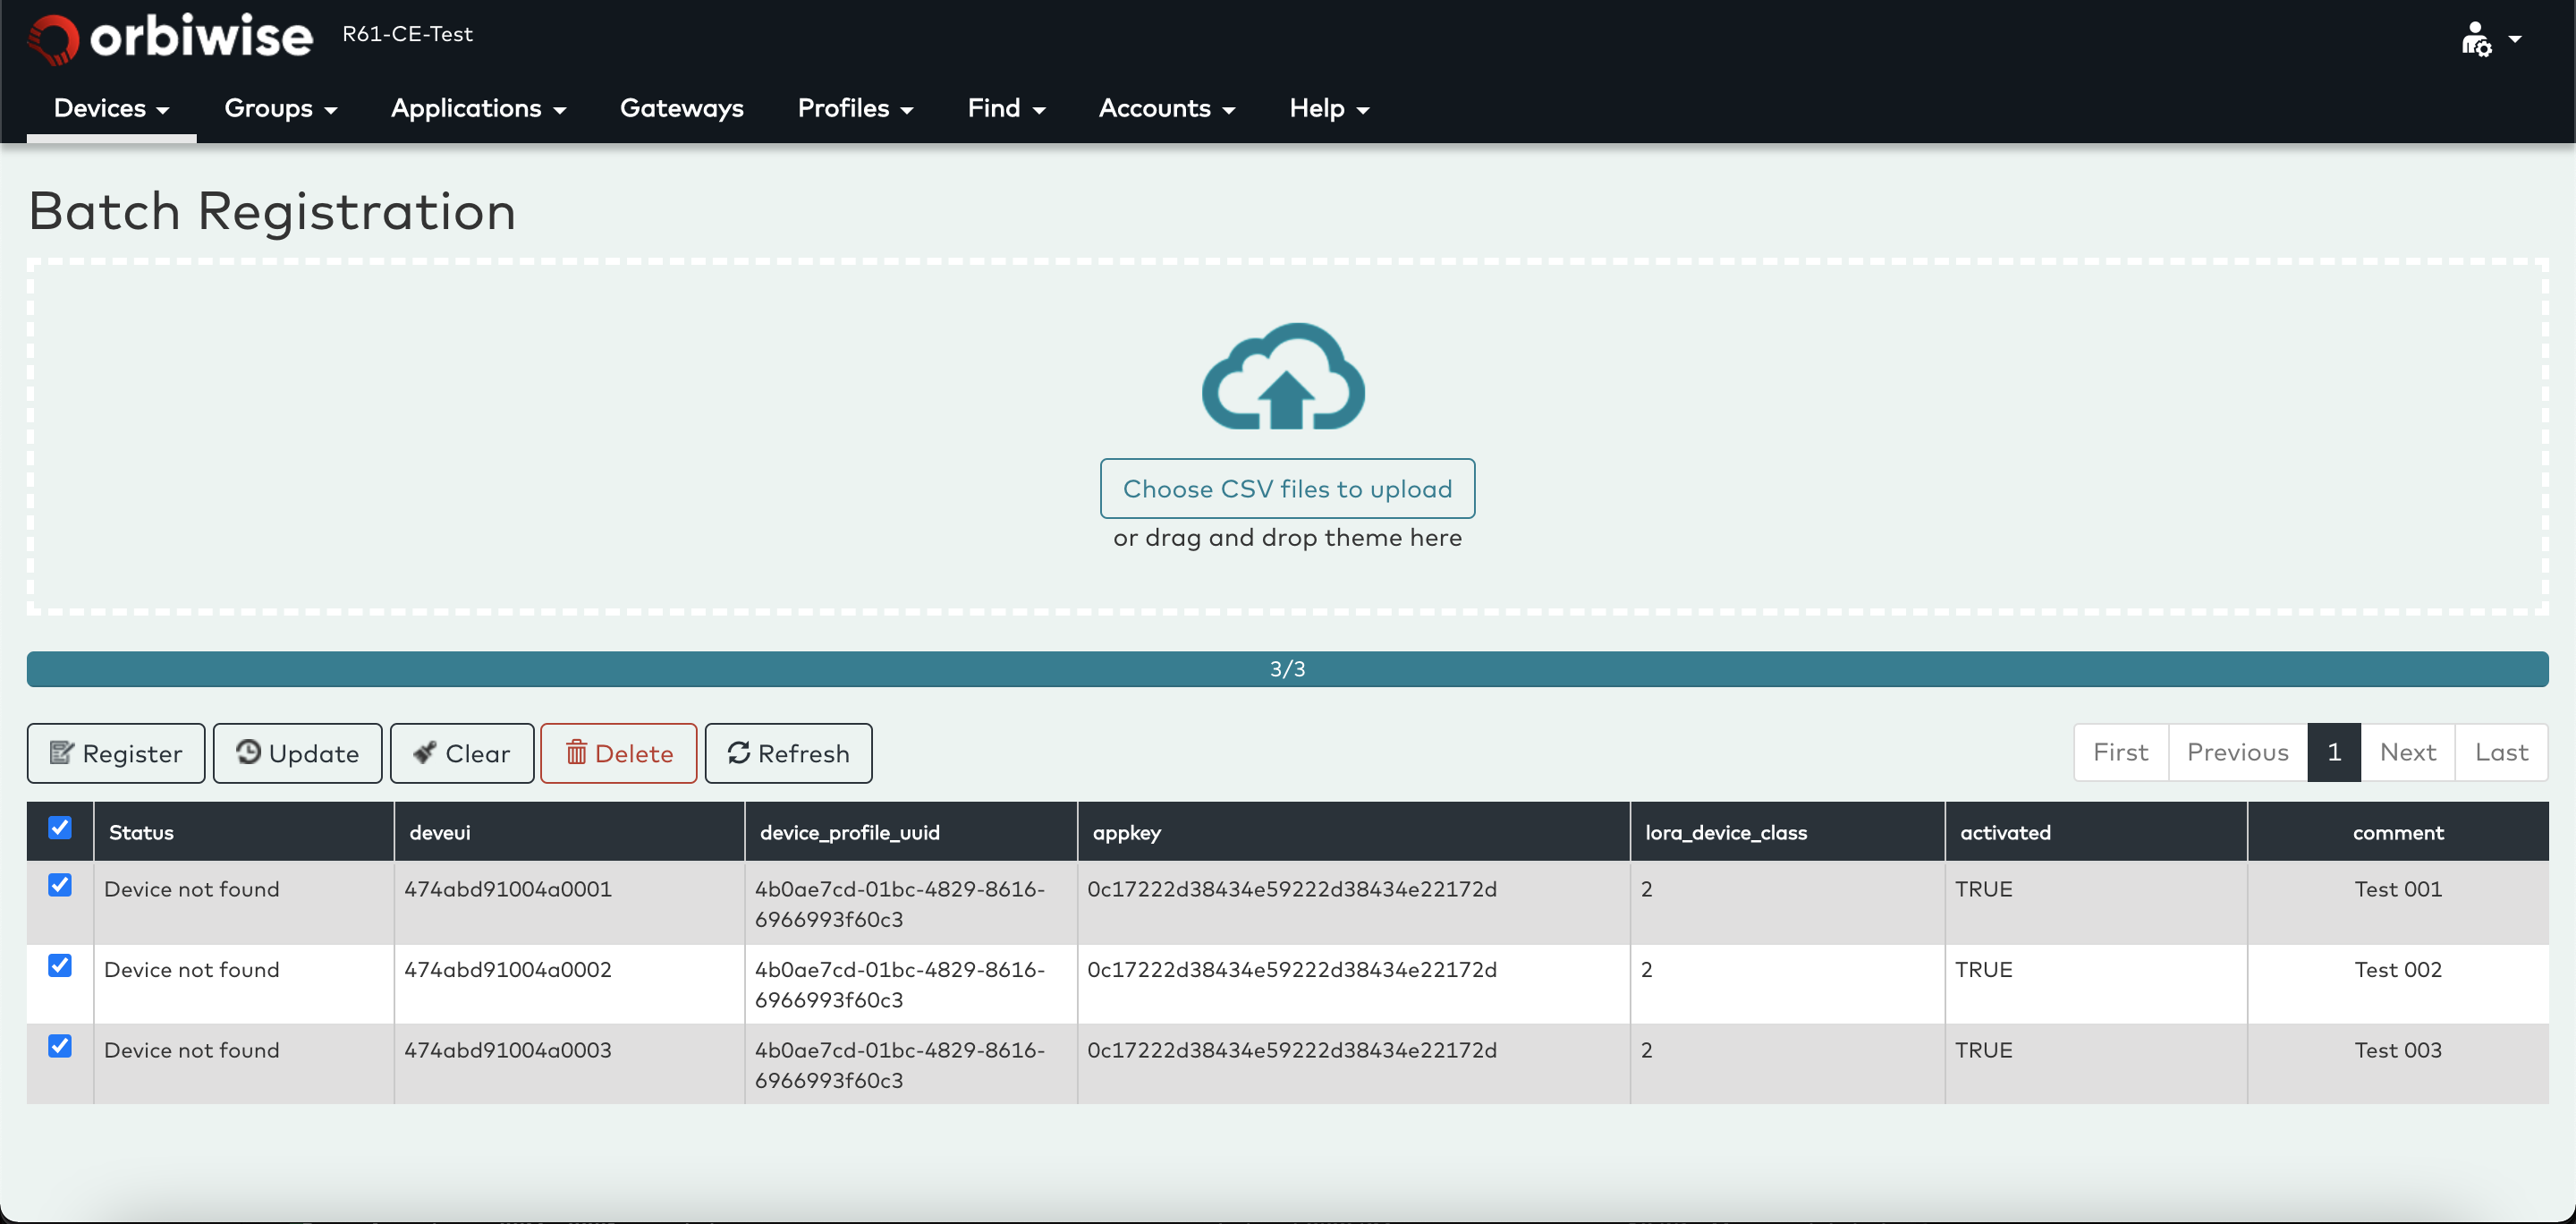
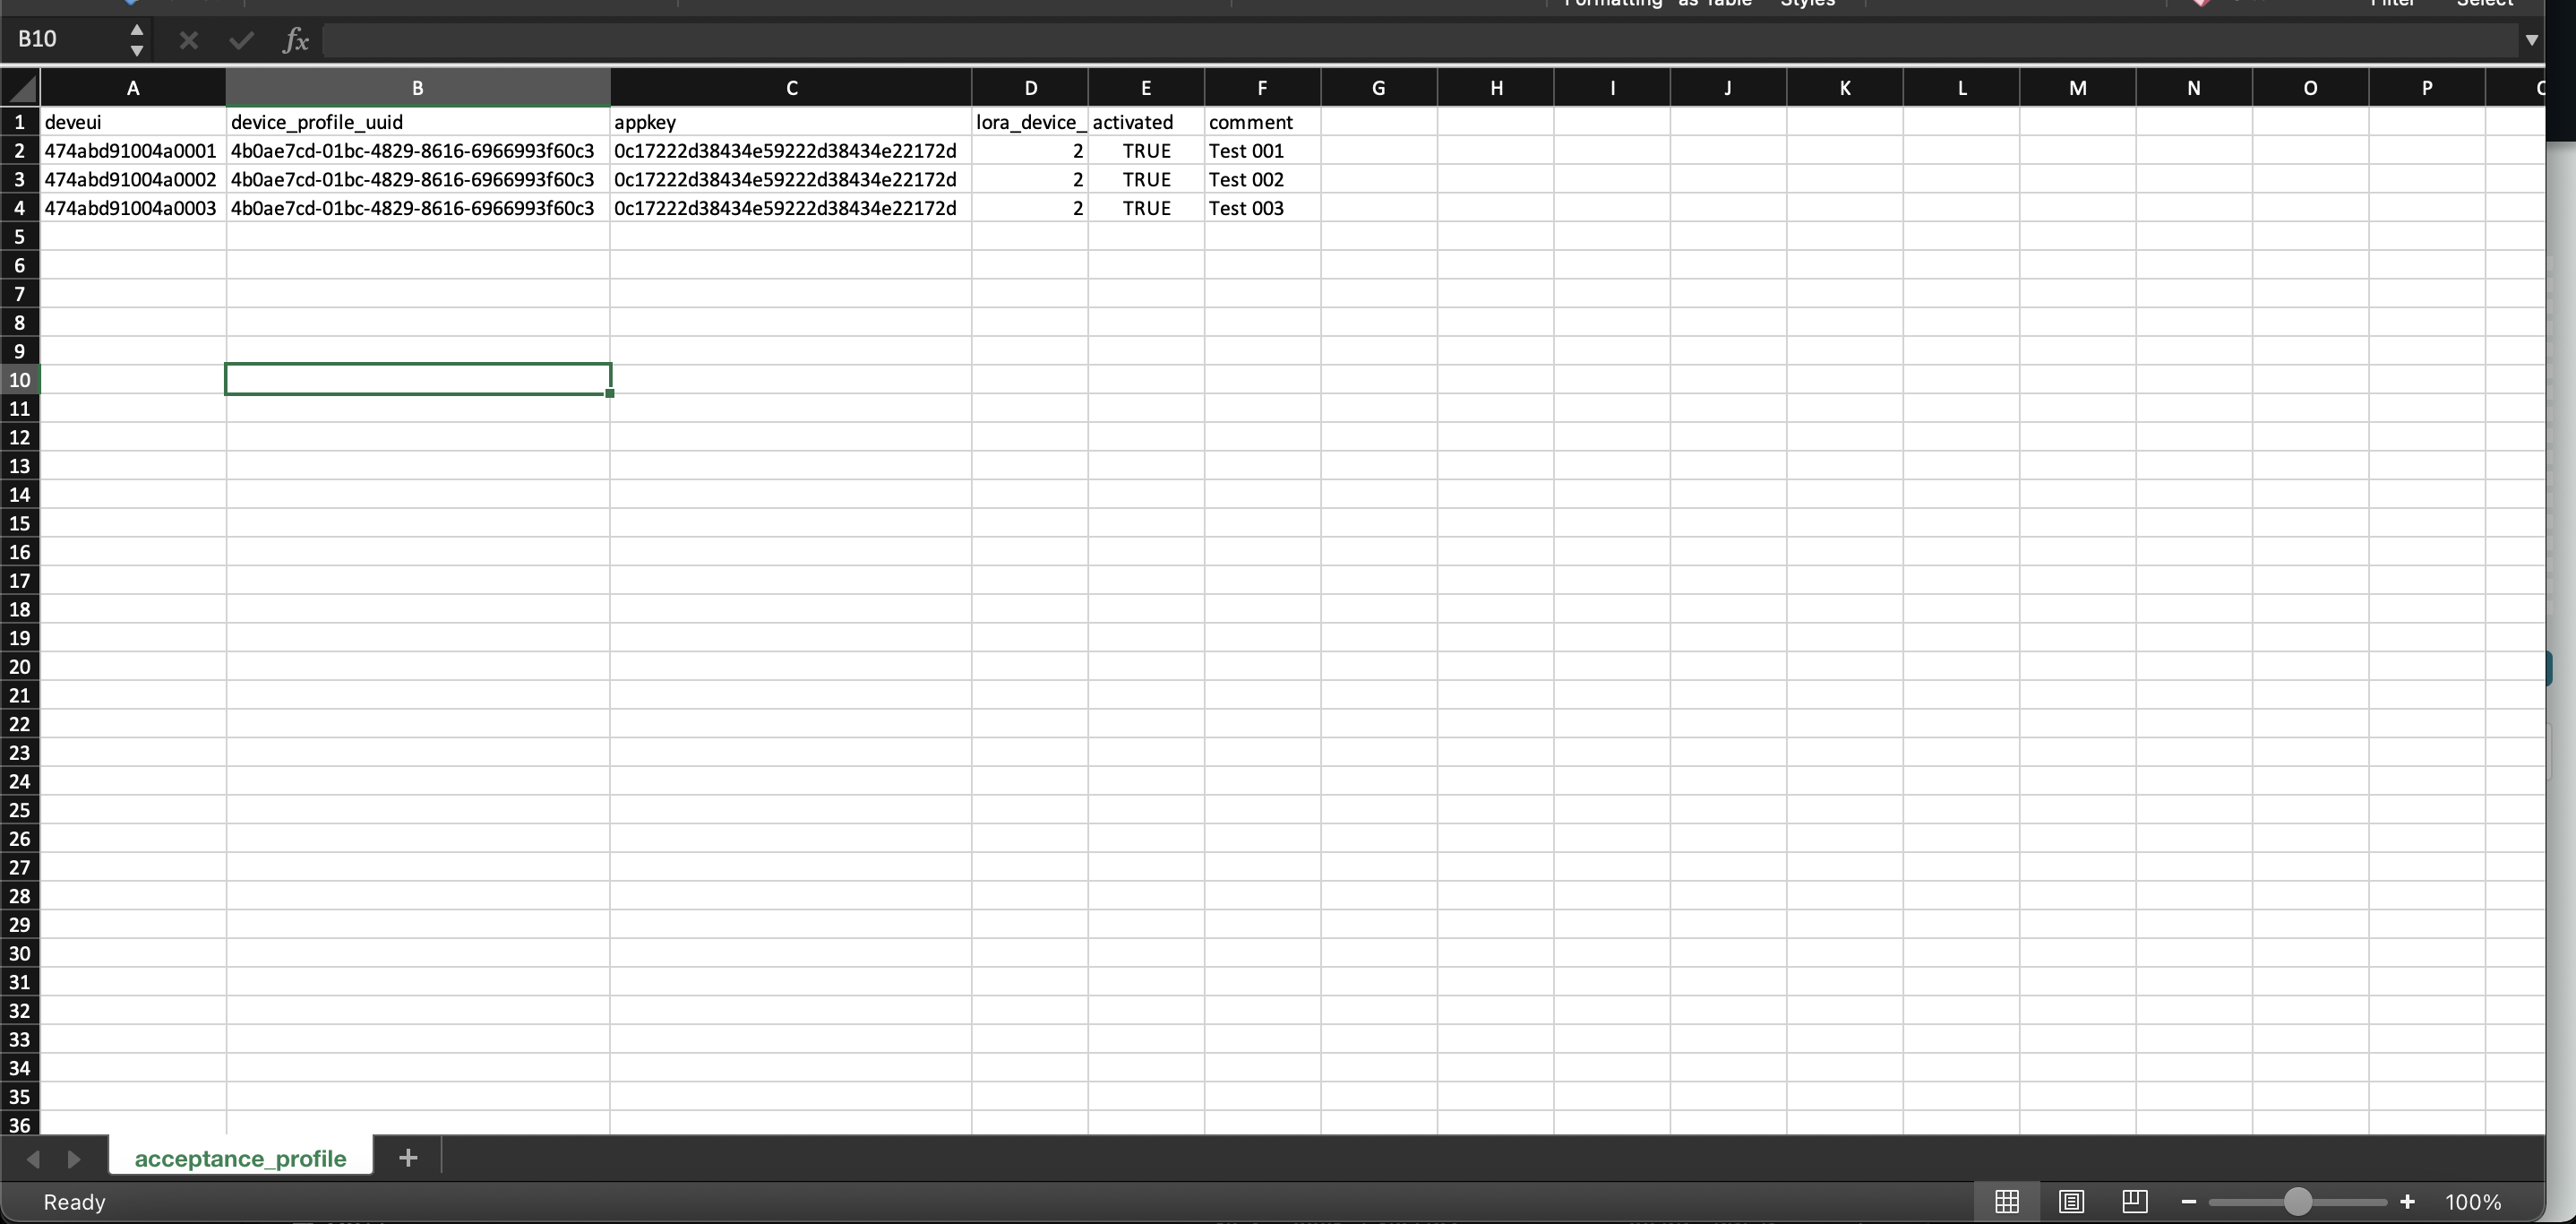
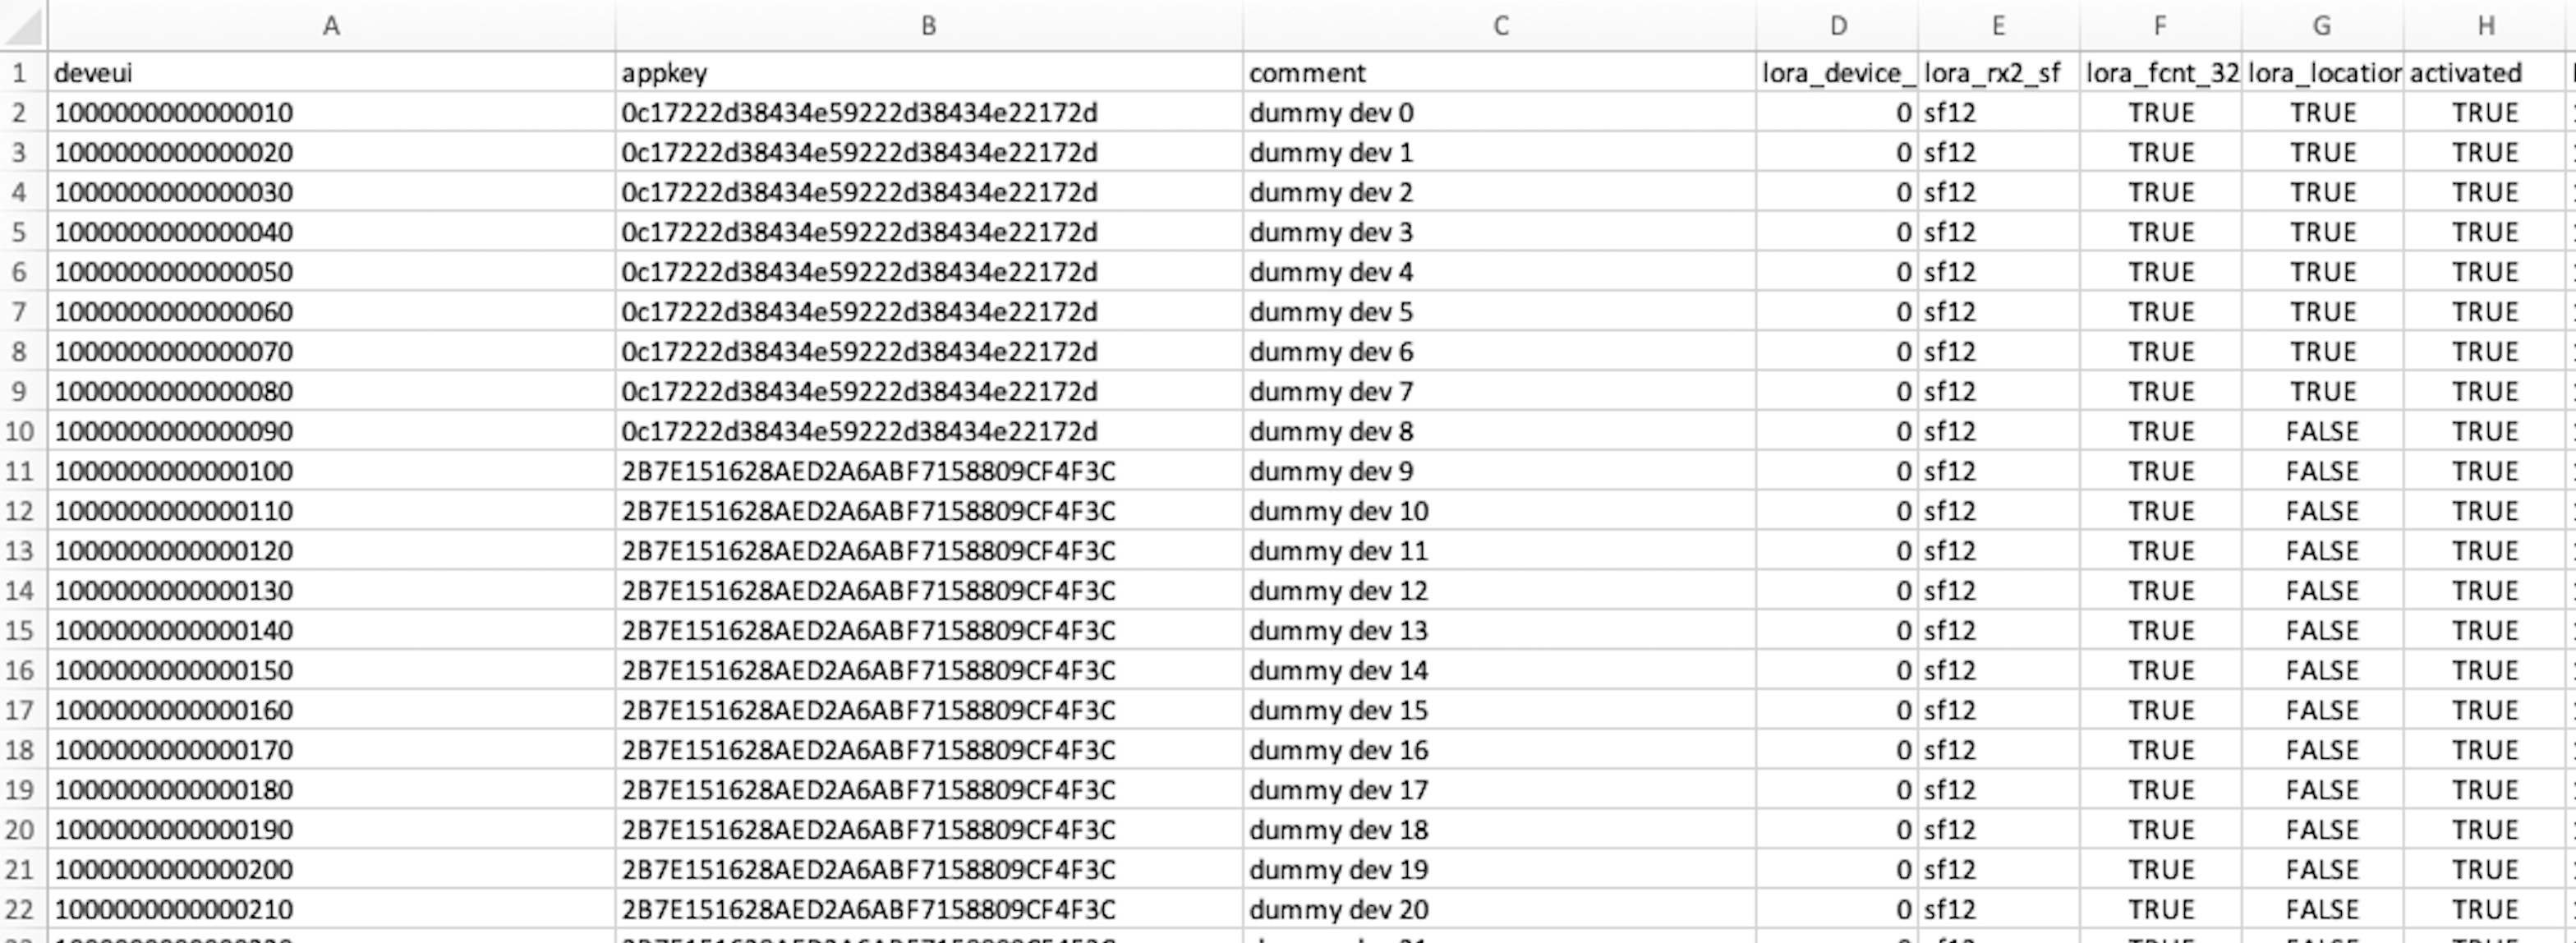
To register Profile Devices the following parameters must be mentioned in the csv file.
The Mandatory and optional fields for Profile device batch registration which need to be provided in the .csv file are given below:
| Status | Description |
|---|---|
| deveui | Mandatory |
| device_profile_uuid | Mandatory |
| service_profile_uuid | Mandatory |
| appkey | Optional |
| comment | Optional |
| lora_device_class | Optional |
| activated | Optional |
For reference please see the image below:
To register Legacy Devices the following parameters must be mentioned in the csv file.
The Mandatory and optional fields for legacy device batch registration which need to be provided in the .csv file are given below:
| Status | Description |
|---|---|
| deveui | Mandatory |
| lora_device_class | Mandatory |
| lora_rx2_sf | Mandatory |
| lora_fcnt_32bit | Mandatory |
| MACVersion | Mandatory |
| RegParamsRevision | Mandatory |
| MaxEIRP | Mandatory |
| lora_major | Mandatory |
| appkey | Optional |
| nwkskey | Optional |
| comment | Optional |
| lora_location | Optional |
| activated | Optional |
For reference please see the image below:
The table shows the status of each DevEUI provided in the file. The possible states are:
| Status | Description |
|---|---|
| Device not found | The Device is currently unknown on the network [the normal state]. |
| Registered | The Device is successfully registered |
| Already Registered | The Device is already registered on the network. |
Check boxes at the beginning of each line can be used to unselect devices that should not be processed under the batch processing.
Press Register to start the registration process to add the selected devices to the network. The progress bar above the buttons will show the status of the registration.
Devices can also be deleted using the batch processing by pressing Delete to delete all the selected devices in the list.
Once the batch process starts, if there are many devices to process, the process can take a while to complete. It is safe to leave the page and even sign out of the UI. The batch process continues to run until it is completed. It is always possible to sign in again check the status by going back to the batch registration view.
The process can be aborted by pressing the clear button. Any devices that has been registered remain registered.
You can also watch the following video to see the Batch Registration process in action:
Batch Registration Profile Demo
Batch Registration Legacy Demo
Payload Decoder
Payload decoder is a special feature of OrbiWAN which allow decoding(as per configured decoding function by the user) of payload before sending it to end application. Also, help of payload decoder you can integrate Thingsboard with OrbiWAN.
Prerequisite:
The decode function is only called for devices that can be decrypted by the network, meaning the network must be able to access the AppSKey.
How it works:
The OrbiWAN has support for inserting small Javascript functions to perform encoding of messages to customizable formats as well as decoder functions to decode the binary payload from a device and translate it into device agnostic data. The functions are provided in Javascript and the OrbiWAN will execute them when needed.
As the functions are executed in real-time the OrbiWAN put some restrictions on what is allowed and in general, the Javascript function must be short and fast to execute. The OrbiWAN will accumulate the time spent in a function and if the average time over a period exceeds 0.1ms the function will be automatically disabled.
The functions are executed in a sandbox which means the use of library function inside the function is highly restricted.
The functions are associated to the devices with device registration parameter payload_decoder_js. When a function is defined, the uplink messages pushed to the applications contain the object that is returned by the function.
It is also possible to make the application push only the decoded object parameters. This can be done by changing the data_format of the application with decoded_json.
And finally, this is also possible to customize the application URL with device tags so the OrbiWAN will customize the URL to which it pushed for each device. This is often used to connect directly to a dashboard.
Payload Decoding function
A payload decoding function is used to translate the binary format of a device into a more device agnostic format. E.g. for a temperature sensor, the sensor may send the temperature readings in a binary format that will have to be converted into an actual message field called “temperature” with and value directly in degree centigrade (or any other unit). When a payload have been decoding in this way it is typically possible to forward the data directly to end applications that may not know the exact sensor used (and hence would not understand the binary payload format), but understand the generic “temperature” field and is able to process it.
Note, the decode function is only called for devices that can be decrypted by the network, meaning the network must be able to access the AppSKey.
To help expose the data to varies IoT platforms and frameworks, it is useful (and highly recommended) to provide also a model description of the output from the device. A model describes which parameters are available from the payload decoder. The model can be queried through REST API on the OrbiWAN so that applications can ask device which kind of data is provided by the device.
E.g. if the device is a temperature sensor it will typically provide the temperature. In this case, the model would contain a parameter “temperature” of type “number” with an optional description.
A payload decoding function can be assigned to a device function.
model = {
temperature:"number",
color:"string",
open:"boolean"
}

decoder = function(uplink, meta) {
const temp =(uplink.data[0] +uplink.data[1] *256) / 10;
const color = temp > 30 ? "red": "green";
const open = uplink.data[2] == 1 ? true: false;
const output = {

json:{
temperature: temp,
color: color,
open: open
}}
return output;
}
The decoder function is called for each payload to decode. The function is called with the following arguments:
uplink:{
data: Buffer,// Buffer object from NodeJS
fport: 1, // the port number
devaddr: 123,// the DevAddr of the device
fcnt: 2345 // the FCNT of the uplink

}
The meta parameter has these fields:
meta:{

freq: 868.1, // received frequency
rssi: -102, // RSSI from best received gateway
snr: 10, // SNR from best received gateway
tags: { // optional tags object on each device

"user-tag-1":"value" //
}
}
Note: the object may have more fields - but presently the above fields are the only fields guaranteed to be there.
The easiest way to set the decoder function is to use e.g. postman and use the direct set key option. This allows to write put the decoder function directly as raw text to the OrbiWAN (without having to format it into JSON):
PUT /rest/nodes/{deveui}?key=payload_decoder_js BODY: raw text of the function described above
Alternatively, it can be set as JSON:
PUT /rest/nodes/{deveui} BODY: {“payload_decoder_js:”JSON-escaped-string-with-above-code”}
Devices tags:
Tags are used to customize the URL to which the OrbiWAN will push, which is required for most of the application platforms.
Tags can be added freely to any device.
PUT /rest/nodes/{deveui} BODY:
{
  "tags": {
    "tb-access-token": "23req34erg45rg",
    "tb-device-id": "e450bd92-69f1-491d-b367-390ad1133148"
  }
}
The naming of the tags can be chosen freely. Assign the access token values (and optionally the device ID) from the TB(ThingsBoard) platform for each of the devices. Assigning these tags will allow the OrbiWAN to access the values for each device when the push message is getting sent.
Finally, we need to make the URL use the tags. When using the “decoded_json” mode, the OrbiWAN will not append any path to the push prefix path. The prefix path will essentially be the complete path used for the push.
We can now use parameter substitution in the path to making the OrbiWAN insert the correct path. Parameters to be substituted in the path are specified this way, e.g.: /path/%{parameter}/end?find=false, where parameters can be e.g. deveui and other parameters.
Now we can use this to build the start message for an application account associated with the devices that must send data to TB(ThingsBoard).
PUT /rest/pushmode/start/{name-of-app-account} BODY:
{
  "data_format": "decoded_json",
  "host": "https://demo.thingsboard.io",
  "path_prefix": "/REST API/v1/${devtags.tb-access-token}/telemetry",
  "port": 443,
  "retry_policy": 0
}
Note that pushmode/start works with the name of the application but not with its uuid. Uuid is used for authentication.
When the above command is issued, the application account will start to push the decoded payload values to the demo.thingsboard.io/REST API/vi/xyz/telemetry URL, where xyz will be automatically replaced with the value of the device tag with the name “tb-access-token”.
You can also watch the following video to see the Payload Decoder process in action:
Paylaod Decoder
Payload Management Using UI
To see data from a device,
Login into UI -> go to Devices -> Click on Manage devices tab.
Select the device to view the data from device list-> Click on Action -> View Data.
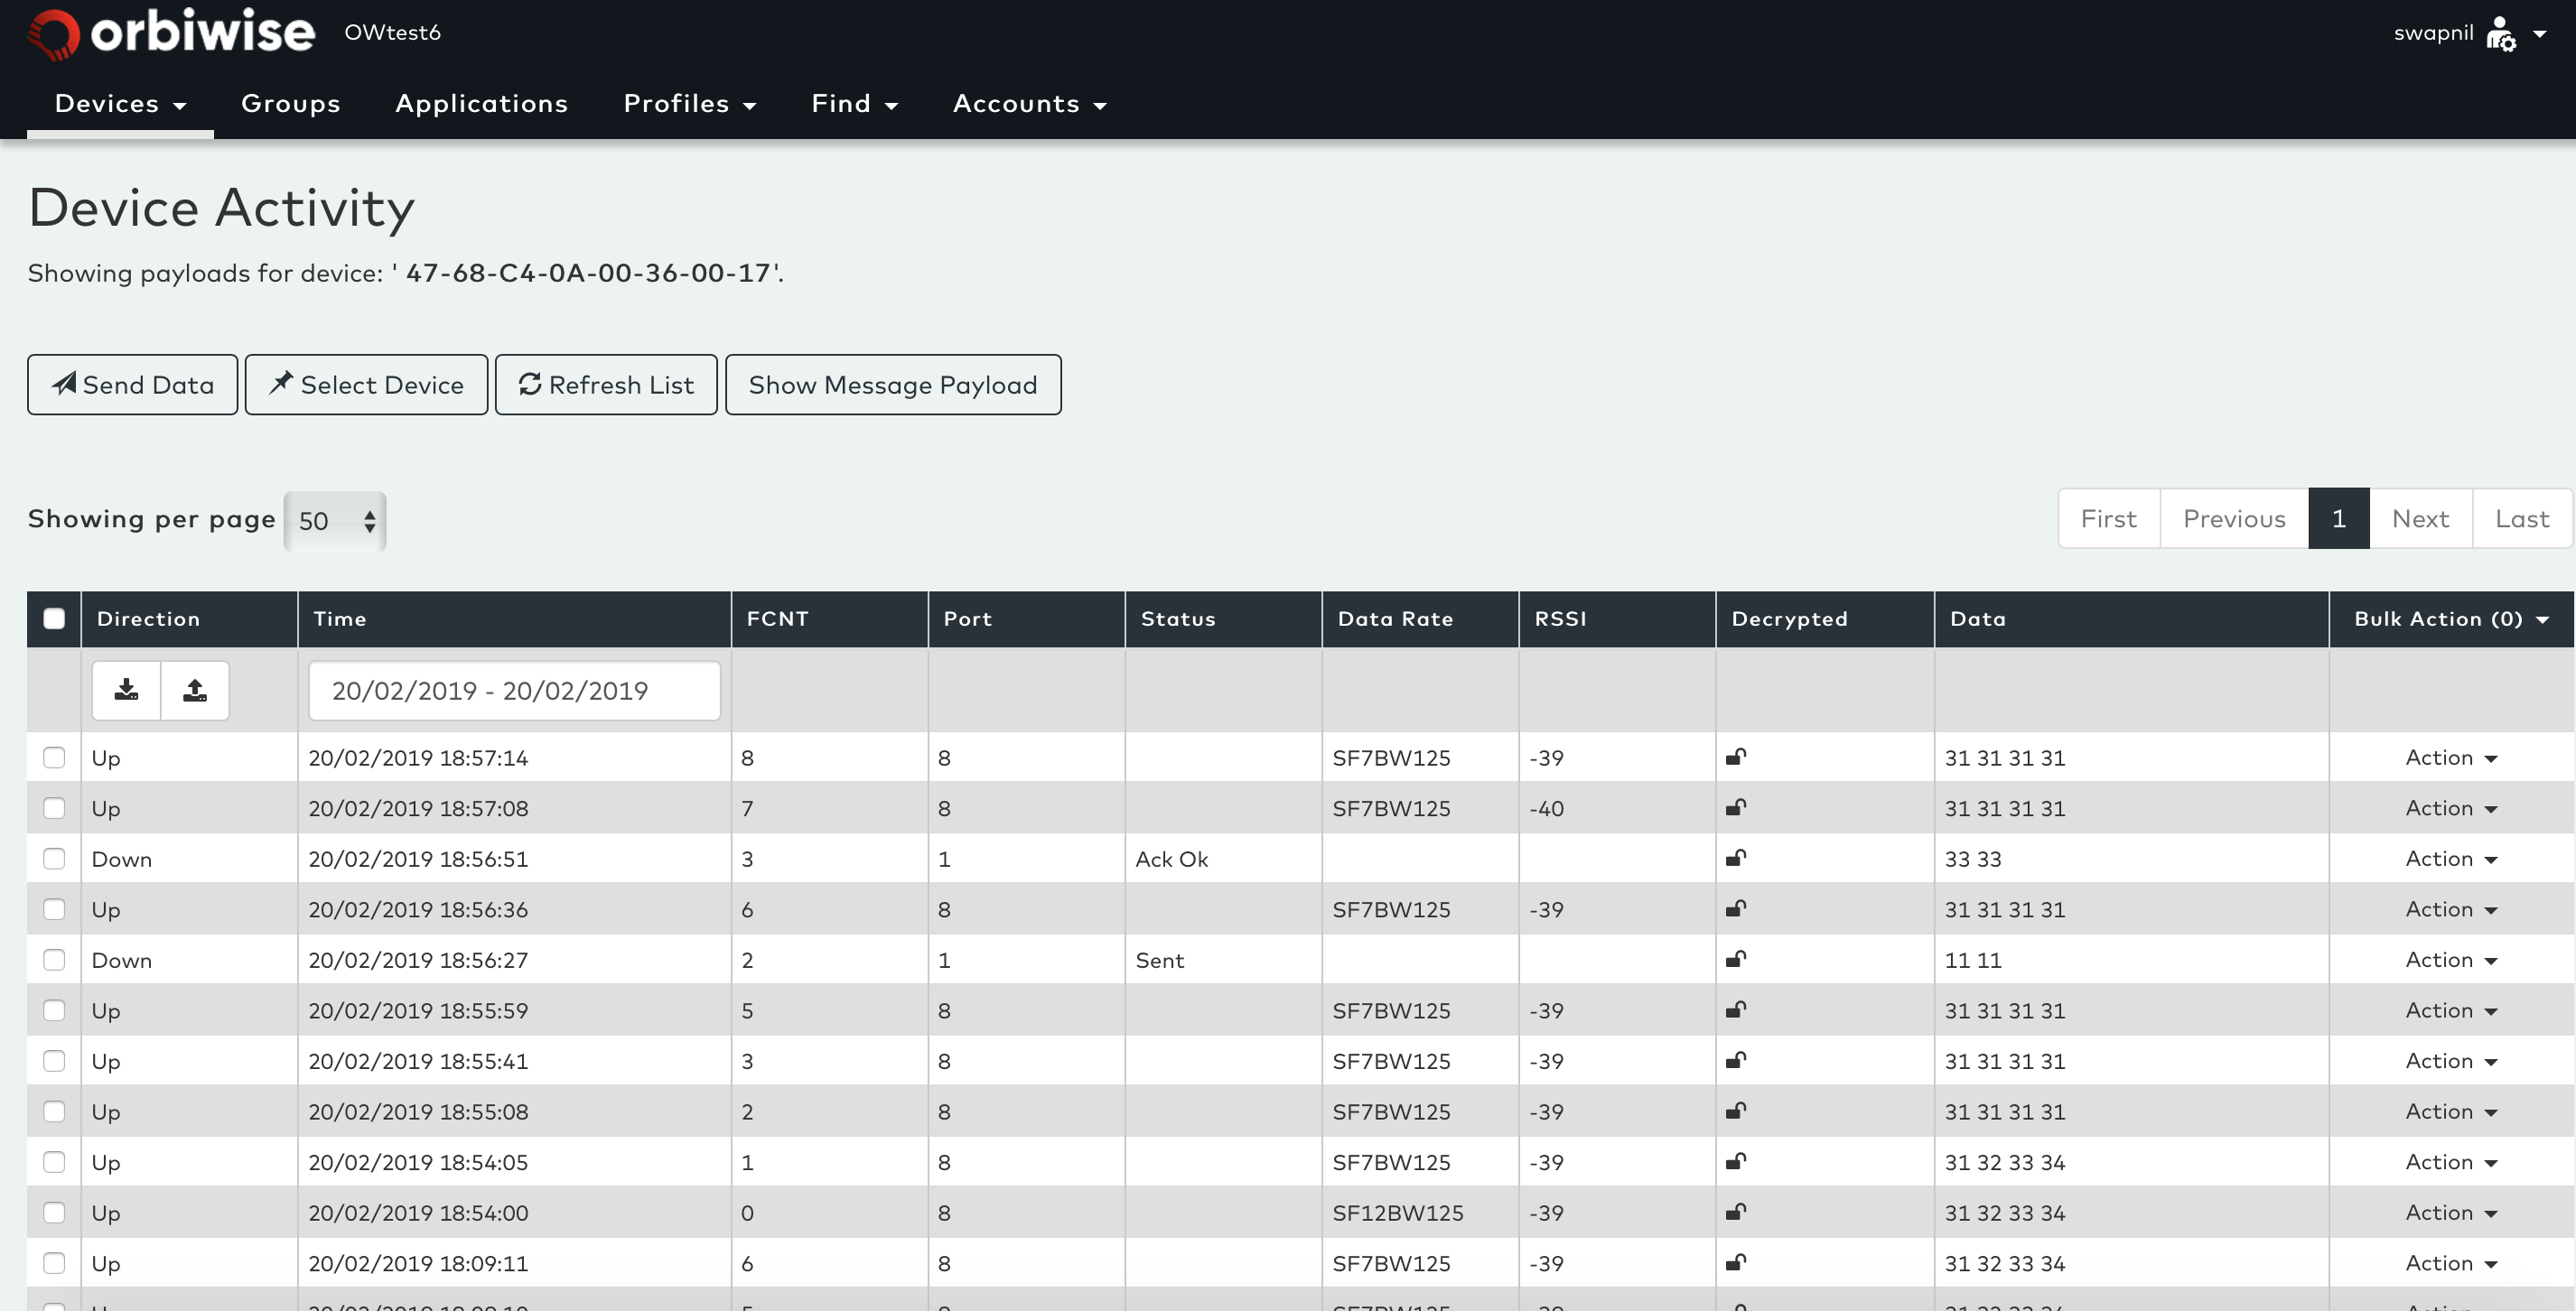
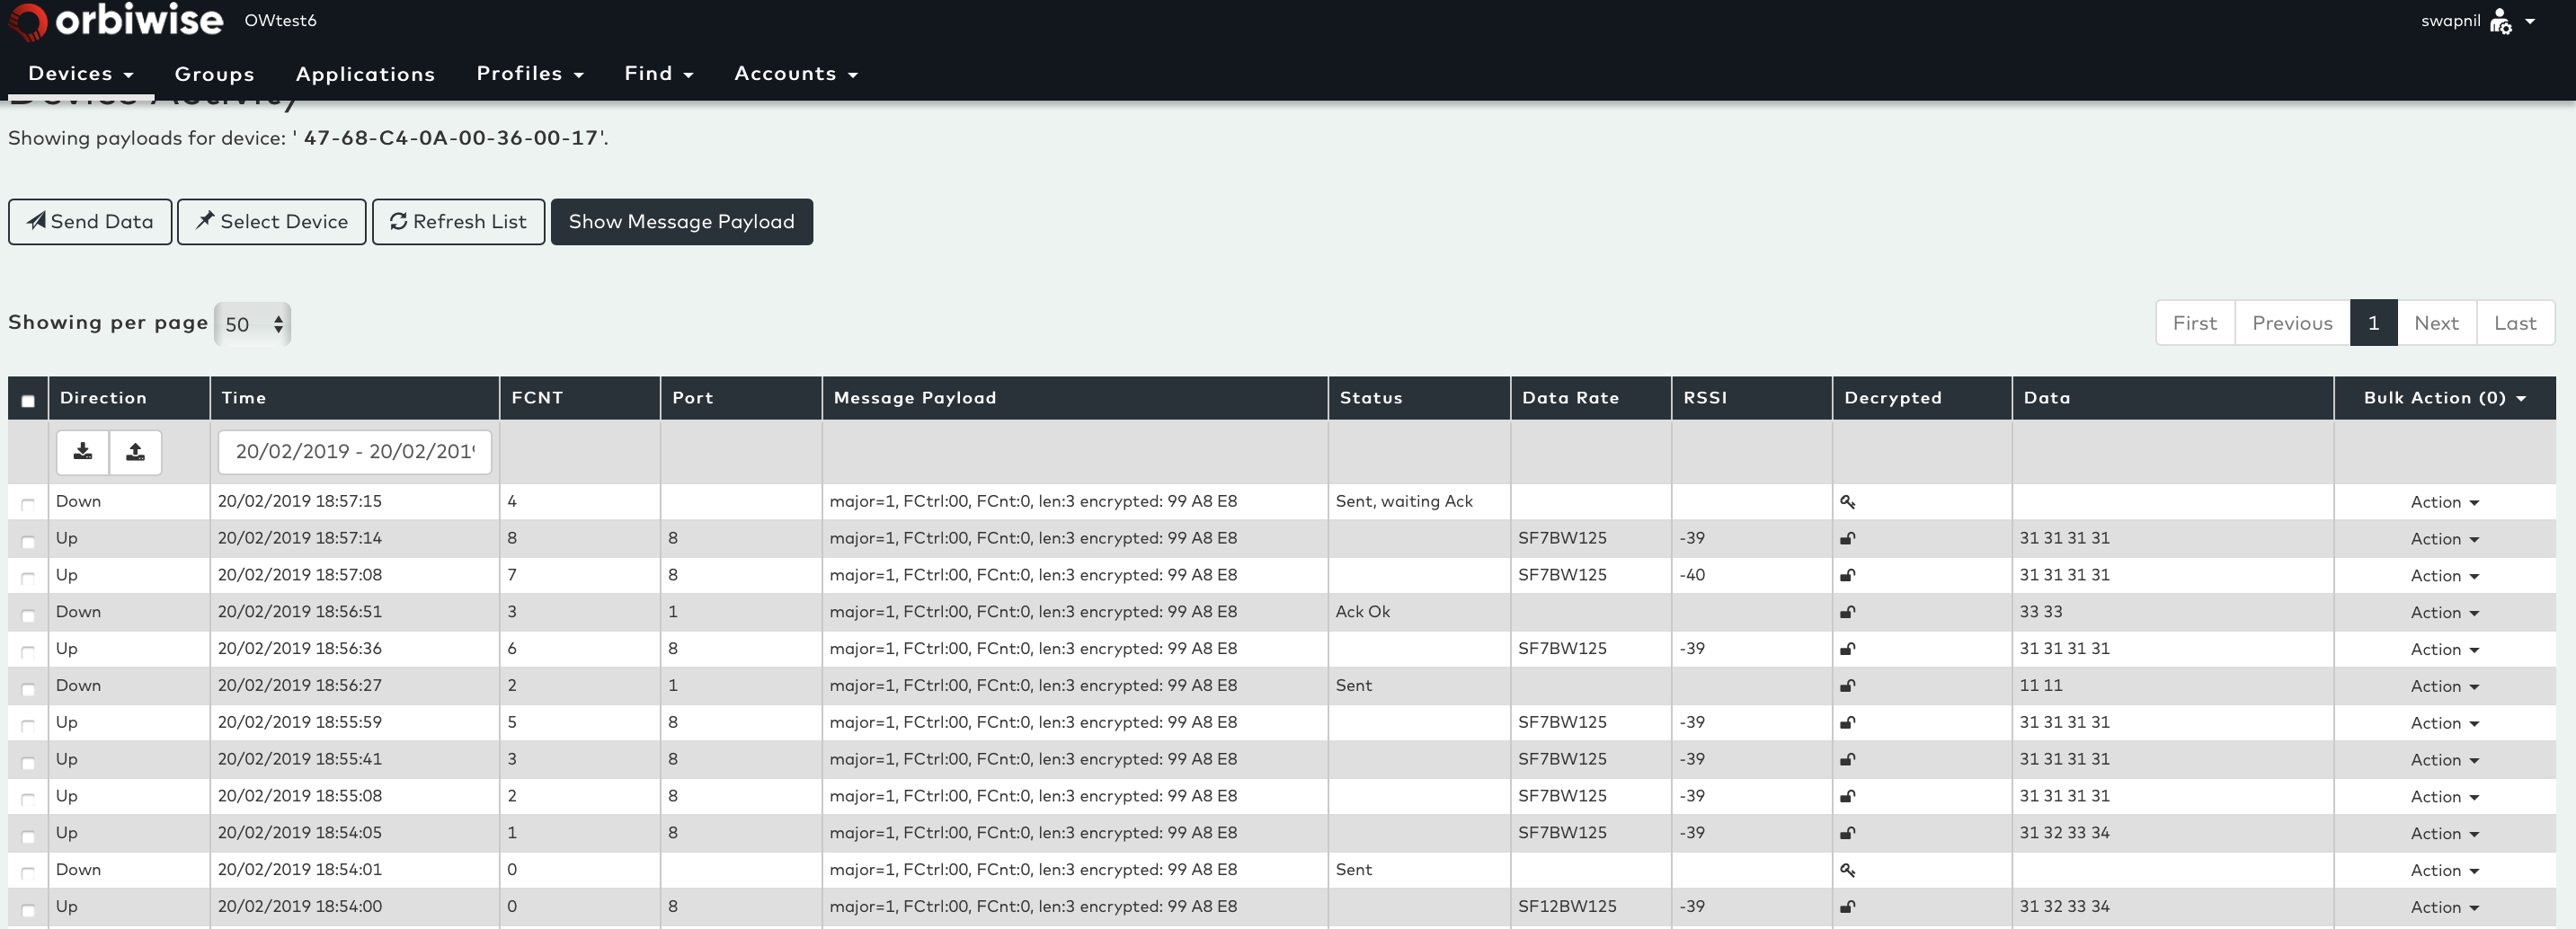
The list will bepopulated for both Uplink & Downlink packets. Each packet is shown with a timestamp, FCNT, Port, Status, Data Rate, RSSI etc. See picture below:
The Dass user/customer can see the payload for any device by clicking on Show Message Payload button on Device Activity Page.This is only available for user/customer that have rights enabled for Message Payload on user account settings to see decoded payload message. See picture below:
Create Groups (For Multicasting)
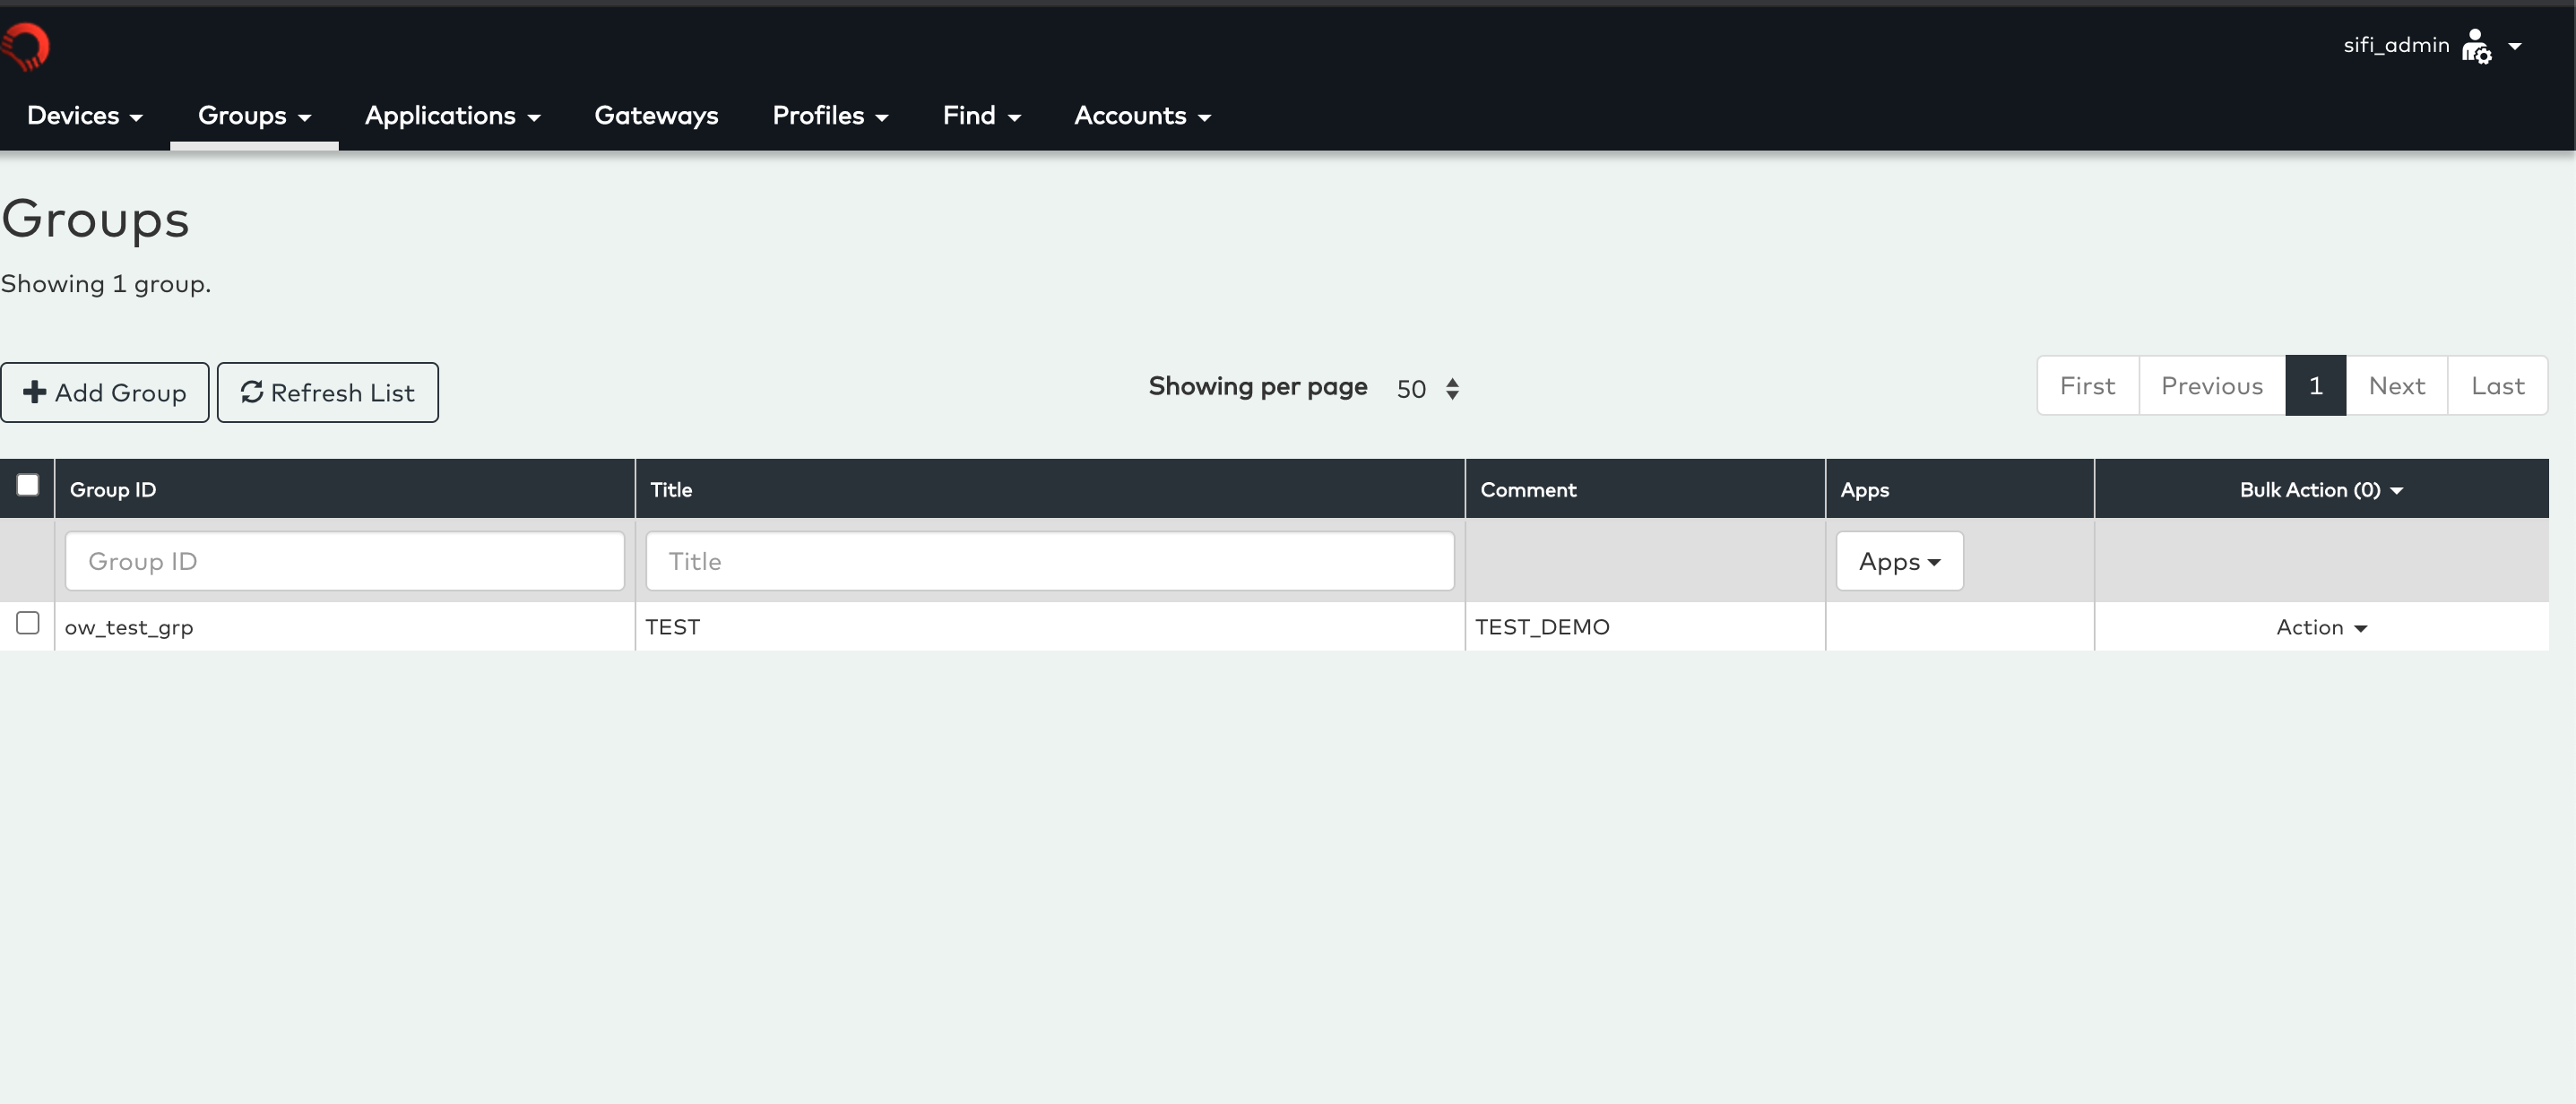
Devices can be grouped by using the group feature. To create a group, click on “Groups” menu.
This open the following dialog:We can create groups using UI:
- Login to UI
- Go to Manage Group
- Click on Add Group
- Fill the details
- Save
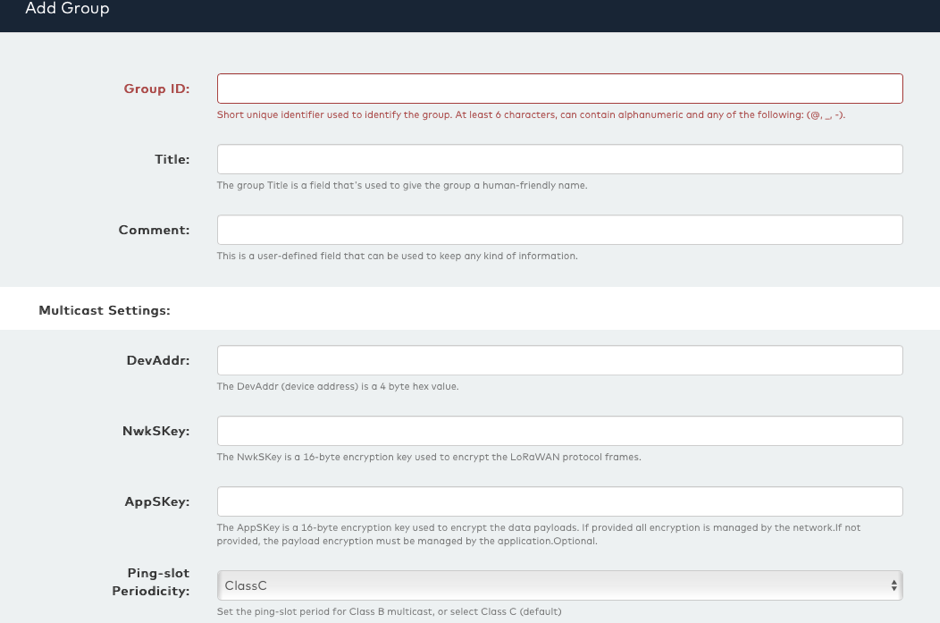
Enter a valid group ID and the title of the group. The title is a plain text description of the groups and can contain spaces, whereas the group ID is must not contain any spaces.
The comment is an optional field that can be used by the user to provide additional information about the group.
In the multicast section the three LoRaWAN multicast values for Class C devices can be entered.
These are:
- Multicast DevADDR
- Multicast NwkSKey
- Multicast AppSKey
These values must match the devices of all the devices. Currently LoRaWAN does not specify how the devices gets provisioned with the multicast parameters, hence it is up to the user or the users application to ensure that the multicast parameters are correct.
DevAddr should be unique per group. The Devaddr is used to locate the multicast packet in trace.
By default, the Ping-slot Periodicity is set to Class C. In case of class B we can set this to Class B multicast.
Multicast DL Scheduling
Multicast is used to send DL to multiple devices which belongs to a group, it is only applicable to class B and C devices. There are two ways to send Multicast Downlink:
Schedule a Multicast DL:
After creating a group and assigning it to the respective devices user can send Multicast data to all the devices associated with that group.
To send a multicast using UI:
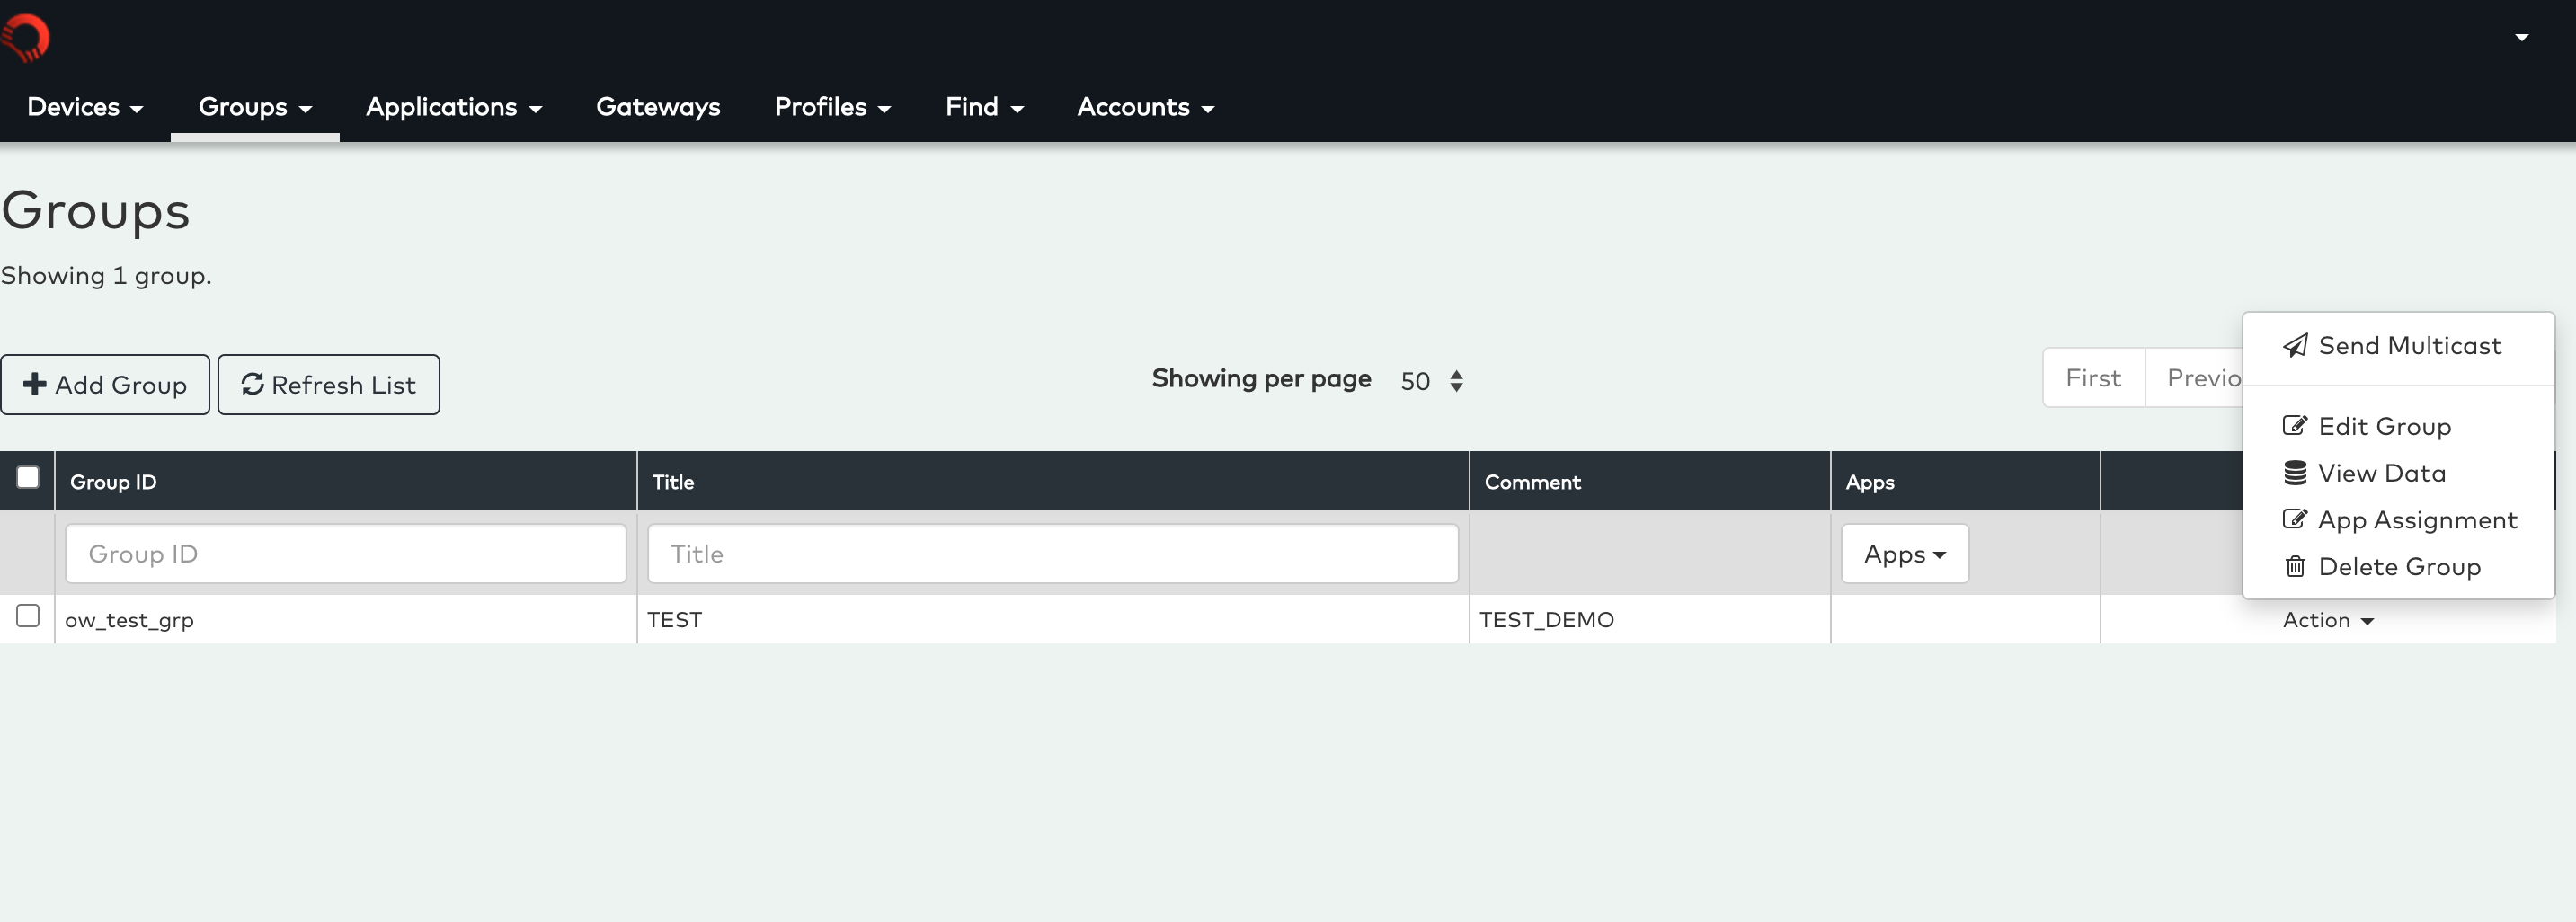
- Login into UI
- Go to Groups tab
- Go to Manage Group
- Click on Action button,
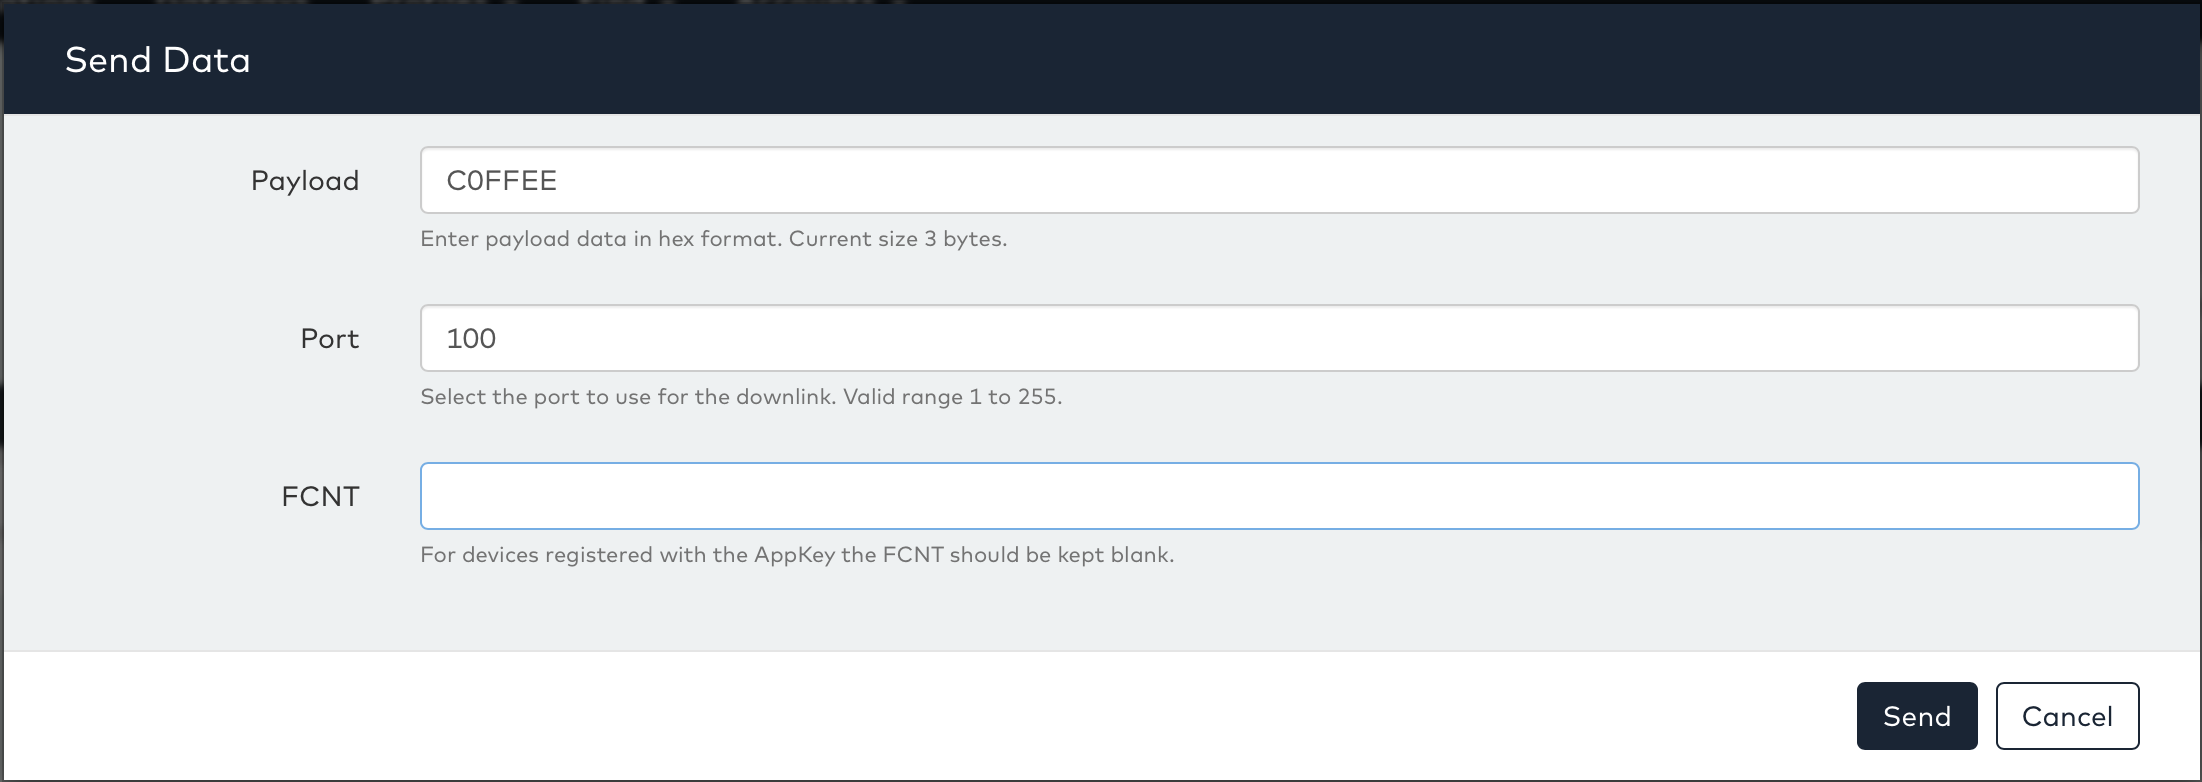
- Then pressing the Send Multicast button will brings up the following “Send Data window for user to enter the details for Multicast,
- User needs to enter, the Payload to be send to devices, Port and FCNT (if required, make sure it is not duplicated),
- Finally, Click on the Send button then all the devices assigned to this group will receive the DL packet from this group devaddr,
You can also watch the following video to see the Group Management and Multicast in action: